Love this? Save it for later!
Share the inspiration with your friends
Introduction
“I wasn’t planning to become a rib expert that rainy Thursday afternoon, but let me tell you, sometimes the best recipes come from a little chaos. I had promised to bring ribs to a backyard cookout, but the weather had other ideas. My trusty grill was drenched, and running out to buy a fancy cut was out of the question—plus, my budget was tighter than usual after that surprise car repair. So there I was, staring at a slab of budget ribs, wondering how on earth I’d pull off something delicious without the usual slow-smoke magic.
Honestly, that’s when the oven to grill method was born. I popped those ribs into the oven low and slow, while the rain hammered the windows, and then finished them off on the grill once the skies cleared. The result? Ribs so tender they nearly fell off the bone, with that irresistible smoky char that screams summertime even on a soggy day. You know that feeling when you bite into something unexpectedly amazing and feel like you just hacked the system? Yeah, that was me, grinning with a messy face and a plate piled high.
Maybe you’ve been there—scrambling to make a meal work with what you have, wondering if it’ll be good enough. Let me tell you, this recipe stuck with me because it’s simple, wallet-friendly, and foolproof. No fancy smokers or expensive cuts needed, just real flavor and a little patience. If you want ribs that taste like a weekend feast without the fuss, keep reading. This tender budget ribs oven to grill method might just become your new go-to trick.”
Why You’ll Love This Recipe
After countless trials and a few charred disappointments, this recipe stands out because it’s truly reliable and delivers on flavor every time. I’ve tested it on busy weeknights, casual weekend hangouts, and even for potlucks where the stakes were high. Here’s why it’s a keeper:
- Quick & Easy: The 3-step method gets tender ribs on your table in about 2.5 hours, which is a breeze compared to traditional smoking.
- Simple Ingredients: You don’t need to hunt down exotic spices or pricey cuts—just basic pantry staples and affordable ribs.
- Perfect for Any Occasion: Whether it’s a family dinner, a last-minute barbecue, or a casual game day, these ribs fit right in.
- Crowd-Pleaser: Kids, adults, picky eaters—you name it, everyone asks for seconds.
- Unbelievably Delicious: The oven slow-cook locks in moisture, and the grill adds that caramelized crust that makes all the difference.
What makes this method different? Instead of fussing with a smoker or long marinating times, you get a perfect balance of tenderness and smoky flavor by combining the best of both worlds: gentle oven cooking followed by quick grilling. It’s like a flavor shortcut that still feels like a special occasion. Plus, the technique is flexible, so you can tweak your rubs and sauces to suit your taste buds.
Honestly, this recipe isn’t just about ribs—it’s about rescuing a meal, impressing your friends, and making cooking fun again, even when life throws a curveball.
What Ingredients You Will Need
This recipe uses simple, wholesome ingredients to deliver bold flavor and satisfying texture without the fuss. Most of these are pantry staples, and substitutions are easy if you have dietary preferences or limited access.
- Budget pork ribs: Baby back or St. Louis style, about 2-3 pounds (900g–1.4kg). I usually grab whatever’s on sale at my local market.
- Dry rub:
- 2 tablespoons brown sugar (adds caramelization and sweetness)
- 1 tablespoon smoked paprika (for that smoky depth)
- 1 teaspoon garlic powder
- 1 teaspoon onion powder
- 1 teaspoon chili powder (optional, for a little kick)
- 1 teaspoon salt
- ½ teaspoon black pepper
- Barbecue sauce: About ½ cup (120 ml). Choose your favorite brand or homemade; I like a tangy, slightly sweet version to balance the ribs.
- Apple cider vinegar or water: 1 cup (240 ml), to pour into the baking pan for moisture during oven cooking.
- Aluminum foil: For wrapping the ribs during the oven phase.
Pro tip: If you want to make this gluten-free, just double-check your barbecue sauce and chili powder labels. For a smoky twist, add a pinch of cumin to your rub. And if fresh ribs aren’t available, frozen work fine too—just thaw fully before cooking.
Equipment Needed
- Oven-safe baking tray or roasting pan: Big enough to hold the ribs flat. I use a rimmed sheet pan lined with foil for easy cleanup.
- Aluminum foil: For tightly wrapping the ribs during the slow oven cook. Heavy-duty foil works best to trap moisture.
- Grill: Charcoal or gas grill for finishing. If you don’t have one, a grill pan on the stove can mimic the effect.
- Tongs: For flipping ribs safely on the grill.
- Basting brush: To apply barbecue sauce evenly during grilling.
If you’re on a budget, a sturdy baking sheet and basic tongs will do the trick—no need for fancy tools. Also, keep a spray bottle handy with water for flare-ups on the grill (learned that the hard way!). Cleaning your grill grates before starting helps prevent sticking and gives you those perfect grill marks.
Preparation Method
- Preheat your oven to 275°F (135°C). This low temperature is key for tender ribs. While it warms up, prepare your ribs by removing the silver skin membrane on the bone side if it’s still attached—it helps the rub penetrate better. (Tip: slide a knife under the membrane and use a paper towel to grip and pull it off.)
- Mix the dry rub ingredients in a small bowl. Pat the ribs dry with paper towels, then generously coat both sides with the rub, pressing it in with your fingers. Don’t rush this step; the seasoning is what builds flavor.
- Place ribs in the baking tray, bone side down. Pour the apple cider vinegar or water into the tray (not over the ribs). This steams the ribs while they bake, keeping them juicy. Cover the entire tray tightly with foil—seal it well to trap the steam.
- Bake for 2 to 2.5 hours. The ribs should be tender enough to pull apart easily but not falling completely off the bone. If you poke the meat with a fork, it should feel soft and give a little.
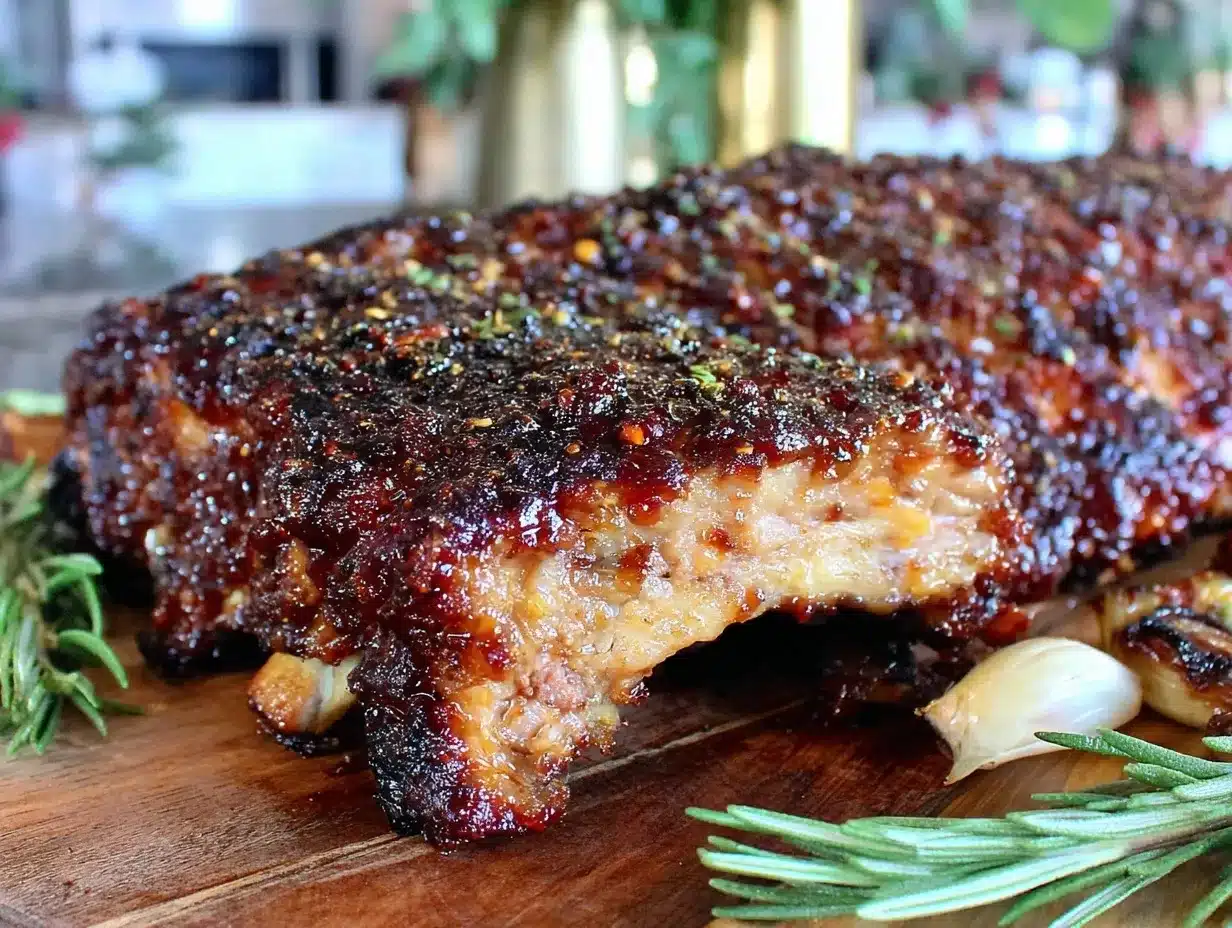
- Preheat your grill to medium-high heat. Carefully remove the ribs from the oven and peel back the foil. Transfer the ribs to the grill grates.
- Brush the ribs with barbecue sauce. Grill for about 5-7 minutes per side, brushing more sauce as you go. Watch closely to avoid burning—flipping often helps.
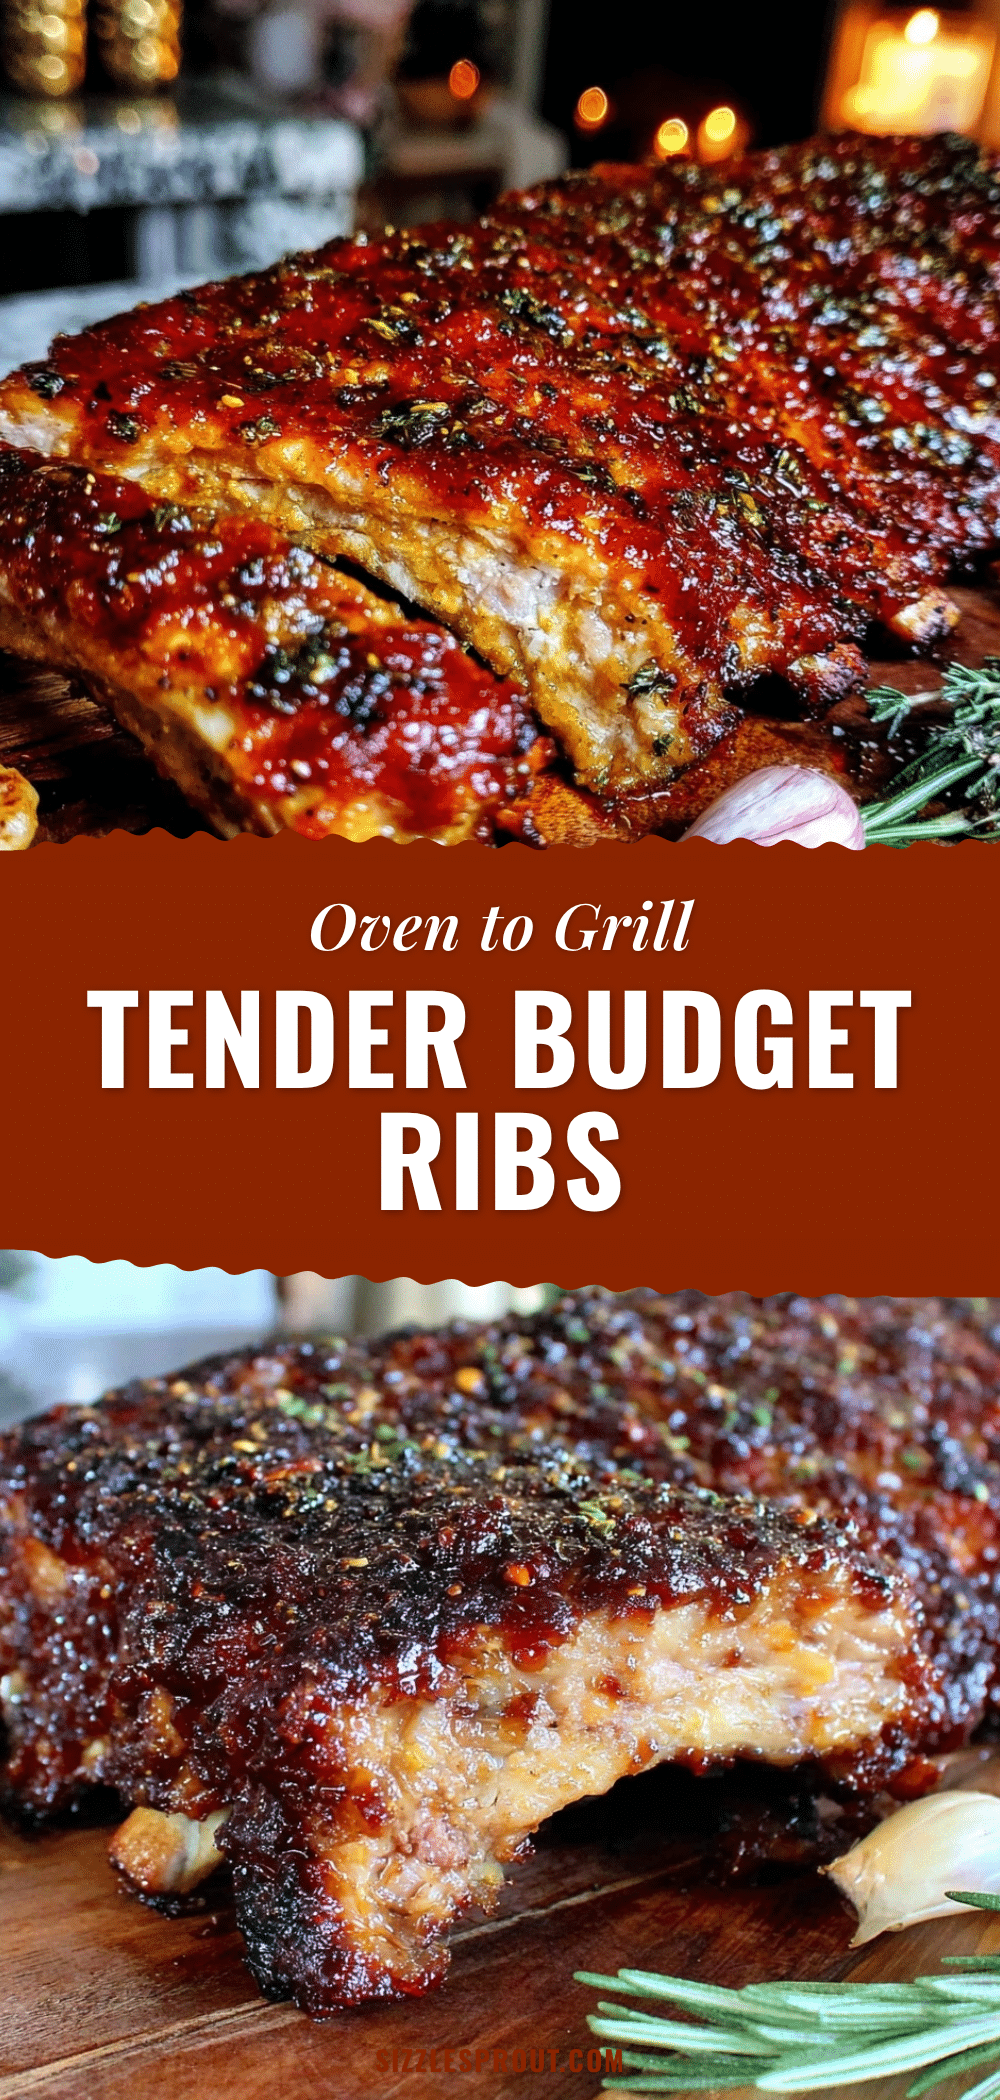
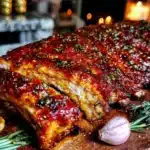
- Once the ribs have a nice char and sticky glaze, remove from the grill and let rest for 5 minutes. This helps the juices redistribute. Then slice between the bones and serve.
Quick troubleshooting: If your ribs aren’t tender enough after baking, wrap them again and cook for an extra 15-20 minutes. If the grill starts to flare up, move the ribs to a cooler spot and reduce sauce application temporarily.
Cooking Tips & Techniques
The oven to grill method is all about patience and timing. Here are some tips I’ve picked up:
- Don’t skip the membrane removal. It might seem tedious, but it makes a huge difference in tenderness and flavor absorption.
- Low and slow is your friend. Cooking at 275°F (135°C) lets the collagen break down without drying out the meat.
- Seal the foil tightly. This traps steam and keeps the ribs juicy during oven cooking.
- Use indirect heat on the grill when finishing. If your grill has hot spots, move ribs away from direct flames to prevent burning.
- Apply barbecue sauce late. Sauces with sugar burn quickly, so save them for the last 10-15 minutes on the grill.
- Rest your ribs after grilling. It seems small, but resting helps the meat hold onto its juices better.
Honestly, the first time I tried this, I was so nervous about the timing I kept opening the foil every 30 minutes. Lesson learned: less is more with heat and fussing. Let the oven do its magic quietly. Also, multitasking with sides while ribs bake saves time and keeps the kitchen chaos manageable.
Variations & Adaptations
This method is a great base for customizing your ribs:
- Spicy Variation: Add cayenne pepper or hot sauce to the dry rub for a fiery kick. I once made this for a friend who loves heat, and it was a hit.
- Smoky Sweet: Swap brown sugar for maple syrup in the rub and finish with a smoky chipotle barbecue sauce.
- Gluten-Free: Use a gluten-free barbecue sauce and double-check all spices for hidden gluten. The ribs come out just as tender and flavorful.
- Oven-Only Option: If you don’t have a grill, after baking, broil the ribs for 5-7 minutes per side to caramelize the sauce.
- Slow Cooker Start: For an even hands-off approach, cook ribs in a slow cooker with a splash of apple cider vinegar for 3-4 hours, then finish on the grill.
One time, I swapped the barbecue sauce for a Korean-inspired glaze with gochujang and honey—unexpected but insanely good. Feel free to experiment with international flavors to make this recipe your own.
Serving & Storage Suggestions
Serve ribs hot off the grill with classic sides like coleslaw, grilled corn, or baked beans. A cold beer or iced tea pairs perfectly to cut through the richness. For a casual twist, wrap ribs in butcher paper or parchment for easy outdoor eating.
Leftovers keep well in an airtight container in the refrigerator for up to 3 days. Reheat gently in the oven at 300°F (150°C) covered with foil, or in a skillet over medium-low heat until warmed through—this keeps them juicy. Avoid microwaving if you want to prevent drying.
Flavors actually deepen after a day, so ribs often taste even better the next day. You can also freeze cooked ribs for up to 3 months; thaw overnight in the fridge before reheating.
Nutritional Information & Benefits
Per serving (about 4 oz / 113g cooked ribs): approximately 300-350 calories, 22g protein, 22g fat, 3g carbohydrates (varies by sauce).
Pork ribs provide a good source of protein and essential B vitamins like B12 and niacin. Using a homemade or low-sugar barbecue sauce helps reduce added sugars, making this meal a more balanced indulgence. If you’re watching carbs, simply use a sugar-free sauce or skip the sauce altogether.
Keep in mind, ribs are a treat—best enjoyed alongside plenty of veggies and whole grains for a well-rounded plate.
Conclusion
This tender budget ribs oven to grill method is proof that great flavor doesn’t need to come with a high price tag or complicated steps. I love how forgiving it is, letting you cook confidently even if you’re juggling a million things in the kitchen. Plus, it’s a recipe that brings people together—messy fingers, smoky aromas, and all.
Feel free to tweak the spices, sauces, and cooking times to suit your style. And hey, if your first attempt isn’t perfect, don’t sweat it—practice makes perfect, and ribs are worth every delicious try.
I’d love to hear how your ribs turn out or any fun twists you add! Drop a comment below or share your photos so we can celebrate those sticky, tender bites together. Happy cooking, and here’s to your next unforgettable meal!
FAQs
How long does it take to cook ribs using the oven to grill method?
The oven phase takes about 2 to 2.5 hours at 275°F (135°C), followed by 10-15 minutes on the grill for finishing.
Can I use this method for frozen ribs?
Yes, but make sure to thaw ribs completely in the fridge before starting the recipe for even cooking.
What if I don’t have a grill—can I finish the ribs another way?
You can broil the ribs in the oven for about 5-7 minutes per side to get caramelization similar to grilling.
Is it necessary to remove the membrane from the ribs?
While optional, removing the membrane helps the ribs become more tender and allows the rub to penetrate better.
How do I prevent the sauce from burning on the grill?
Apply barbecue sauce during the last 10-15 minutes of grilling and flip often to avoid burning sugary sauces.
For those curious about other recipes that pair well, you might enjoy my crispy garlic chicken or the smoky grilled vegetables perfect for a backyard feast.
Pin This Recipe!
Tender Budget Ribs Oven to Grill Method Easy 3-Step Recipe for Perfect Flavor
A simple, budget-friendly recipe for tender, flavorful pork ribs using a low and slow oven cook finished on the grill for a smoky char. Perfect for any occasion and easy to customize.
- Prep Time: 15 minutes
- Cook Time: 2 hours 30 minutes
- Total Time: 2 hours 45 minutes
- Yield: 4 servings 1x
- Category: Main Course
- Cuisine: American
Ingredients
- 2–3 pounds baby back or St. Louis style pork ribs
- 2 tablespoons brown sugar
- 1 tablespoon smoked paprika
- 1 teaspoon garlic powder
- 1 teaspoon onion powder
- 1 teaspoon chili powder (optional)
- 1 teaspoon salt
- ½ teaspoon black pepper
- ½ cup (120 ml) barbecue sauce
- 1 cup (240 ml) apple cider vinegar or water
- Aluminum foil
Instructions
- Preheat your oven to 275°F (135°C). Remove the silver skin membrane from the bone side of the ribs if attached.
- Mix the dry rub ingredients (brown sugar, smoked paprika, garlic powder, onion powder, chili powder, salt, black pepper) in a small bowl. Pat ribs dry and coat both sides generously with the rub.
- Place ribs bone side down in a baking tray. Pour apple cider vinegar or water into the tray (not over ribs). Cover tightly with aluminum foil to trap steam.
- Bake ribs for 2 to 2.5 hours until tender but not falling off the bone.
- Preheat grill to medium-high heat. Remove ribs from oven and peel back foil. Transfer ribs to grill grates.
- Brush ribs with barbecue sauce and grill 5-7 minutes per side, brushing more sauce as you go. Flip often to avoid burning.
- Remove ribs from grill once they have a nice char and sticky glaze. Let rest for 5 minutes before slicing between bones and serving.
Notes
Remove the membrane for better tenderness and flavor absorption. Seal foil tightly to trap steam. Use indirect heat on the grill to avoid burning. Apply barbecue sauce during the last 10-15 minutes of grilling and flip often. Rest ribs after grilling to redistribute juices. If ribs are not tender after baking, wrap and cook an additional 15-20 minutes. For no grill, broil ribs 5-7 minutes per side to caramelize sauce.
Nutrition
- Serving Size: About 4 oz (113 g) c
- Calories: 325
- Fat: 22
- Carbohydrates: 3
- Protein: 22
Keywords: budget ribs, oven to grill ribs, easy ribs recipe, tender ribs, barbecue ribs, pork ribs, smoky ribs, backyard cookout