Love this? Save it for later!
Share the inspiration with your friends
Third time in as many days I’ve stood over a baking sheet, piping bag in hand, squinting at tiny cookie faces. The first batch, the eyes were too close together—they looked worried, not wrapped. The second, I got heavy-handed with the powdered sugar and they looked like they’d survived a blizzard, not a bandage. But this third round? These little guys finally got it right. They’re cute, they’re creepy-adjacent, and honestly? They’re the easiest thing I’ve made all week that actually felt like a win.
I wasn’t trying to reinvent Halloween baking. I just wanted something my kids could help with that didn’t involve carving a pumpkin (we all know how that ends—sticky hands, soggy newspaper, and a trip to the store for a replacement pumpkin). These adorable easy Halloween mummy sugar cookies came together on a random Tuesday afternoon when I needed a project that was more fun than folding laundry but less stressful than a from-scratch layer cake. And here we are. They’re silly, they’re simple, and they somehow make everyone who sees them smile. That’s the kind of Halloween magic I can get behind.
Why You’ll Love This Recipe
Let’s be real—Halloween baking can get complicated fast. Between the fondant, the food coloring, and the three-hour decorating sessions, sometimes you just want something that looks impressive without the stress. These mummy cookies are that recipe.
- Quick & Easy: From start to finish, you’re looking at about 30 minutes. No chilling, no complicated techniques, no crying over melted chocolate.
- Simple Ingredients: You probably have most of this stuff already. Sugar cookie dough, white frosting, and candy eyes. That’s basically it.
- Perfect for Halloween Parties: These are the kind of cookies that disappear first at any gathering. Kids love them, adults pretend they’re too cool but sneak three.
- Crowd-Pleaser: I’ve brought these to playdates, classroom parties, and even a Halloween potluck. Every single time, someone asks for the recipe.
- Unbelievably Adorable: There’s something about those little candy eyes peeking out from under the frosting that just hits different. It’s cute, it’s funny, and it’s Halloween without being scary.
What makes this version different from the other mummy cookie recipes floating around? It’s the texture. We’re using a soft, slightly chewy sugar cookie base that holds up to the frosting without getting soggy. And the frosting technique? I’ve tested it six ways from Sunday. Too thick and it looks like plaster. Too thin and it runs right off. This method gives you that perfect, slightly ragged mummy wrap look every single time.
Honestly, this is the kind of recipe that makes you feel like a baking rockstar with almost zero effort. And if you’re anything like me, that’s exactly the energy you need during the chaos of October.
What Ingredients You Will Need
This recipe uses simple, pantry-friendly ingredients to create cookies that are soft, flavorful, and the perfect canvas for your mummy masterpieces. No fancy baking supplies required—just the good stuff you probably already have on hand.
- For the Sugar Cookies:
- All-purpose flour, 2 ½ cups (300g) – Spoon and level it for the most accurate measurement. Too much flour makes dense cookies.
- Unsalted butter, 1 cup (226g), softened – I really do recommend using a good brand like Kerrygold for the richest flavor. Let it sit out for about 30 minutes before you start.
- Granulated sugar, 1 cup (200g) – Standard white sugar gives these cookies that perfect crisp edge and soft center.
- Large egg, 1, room temperature – If you forget to take it out of the fridge, just set it in a bowl of warm water for 5 minutes.
- Vanilla extract, 1 teaspoon – Pure vanilla makes a difference here. Imitation works in a pinch, but pure adds a warmth you can taste.
- Baking powder, ½ teaspoon – Helps the cookies puff up just a little without spreading too much.
- Salt, ¼ teaspoon – Balances the sweetness and brings out the vanilla flavor.
- For the Mummy Wraps & Decorating:
- Vanilla frosting, 1 cup (store-bought or homemade) – I’ve used both, and honestly, canned frosting works perfectly here. It’s already the right consistency for piping. If you want to make your own, a simple buttercream with ½ cup butter, 2 cups powdered sugar, and 2 tablespoons milk works great.
- Candy eyeballs, 1 small bag (about 24-30) – You can find these at any grocery store in the baking aisle, or online. Wilton makes good ones that stick well.
- Powdered sugar, 2 tablespoons (optional, for dusting) – This gives them that “ancient mummy” dusty look. Totally optional, but adds a nice touch.
Ingredient Tips: If you want to use a sugar cookie mix from a box, go for it—just follow the package instructions for drop cookies and skip the rolling. For a gluten-free option, use a 1:1 gluten-free flour blend. I’ve tested this with Bob’s Red Mill and it worked beautifully. And if you can’t find candy eyeballs? You can make them by piping tiny white frosting dots with a black dot in the center. More work, but doable in a pinch.
Equipment Needed
You don’t need a professional bakery setup for these cookies. Here’s what you’ll actually use:
- Baking sheets (2) – Standard half-sheet pans work great. Line them with parchment paper for easy cleanup.
- Parchment paper or silicone baking mats – Silicone mats give the most even browning, but parchment is perfectly fine.
- Mixing bowls (medium and large) – One for dry ingredients, one for wet.
- Electric hand mixer or stand mixer – You can cream the butter and sugar by hand, but your arm will thank you for using a mixer.
- Piping bag or zip-top bag – For the frosting. A zip-top bag with a tiny corner snipped off works just as well as a fancy piping bag. I’ve done it both ways.
- Cooling rack – Important for letting the cookies cool completely before decorating. Frosting on warm cookies is a mess you don’t want.
- Small offset spatula (optional) – Helpful for spreading, but not necessary.
Budget-Friendly Tip: If you don’t have a piping bag, seriously just use a sandwich bag. Snip off a tiny corner (like ⅛ inch) and you’re good to go. I’ve been doing this for years and it works perfectly.
Preparation Method
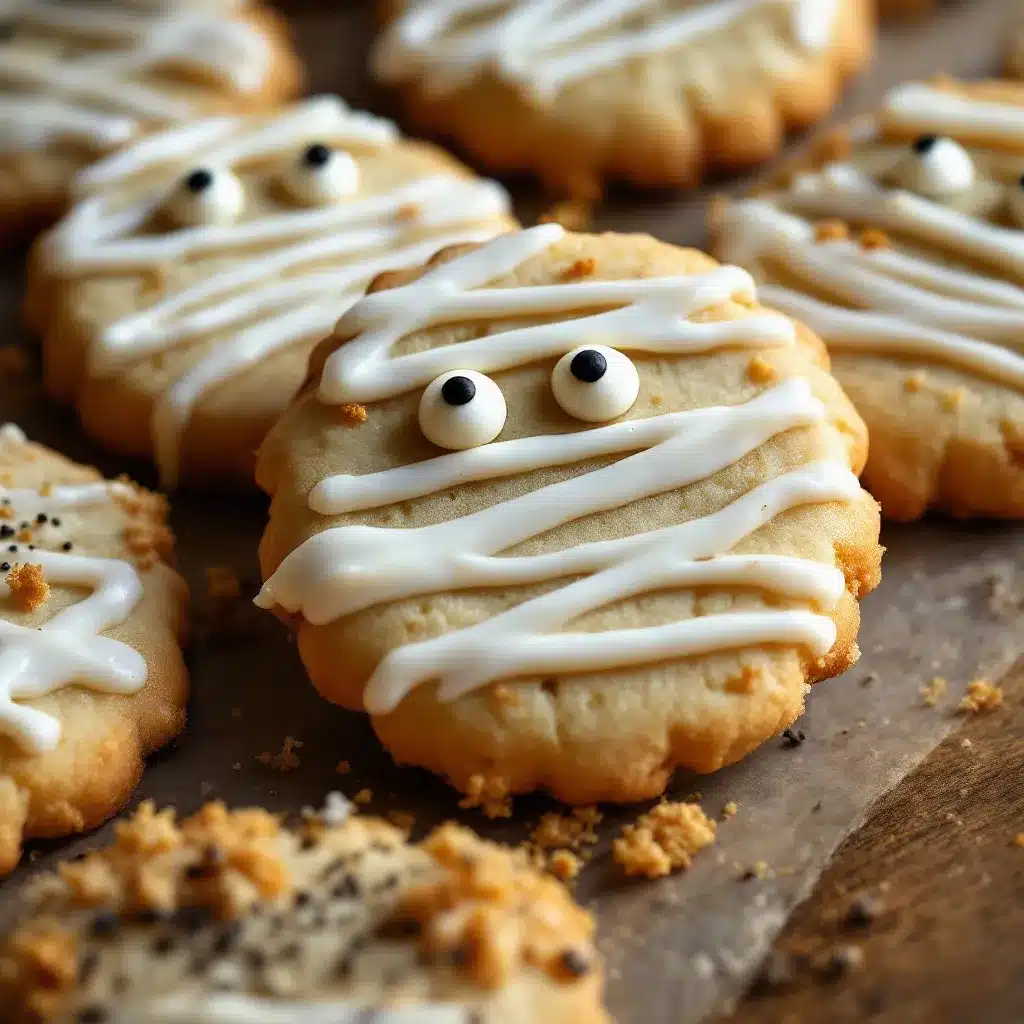
Alright, let’s make some mummies. This process is straightforward, but I’ll walk you through every step so you don’t end up with worried-looking cookies like I did the first time.
Step 1: Make the Cookie Dough
Preheat your oven to 350°F (175°C). In a medium bowl, whisk together the flour, baking powder, and salt. Set that aside. In a large bowl, beat the softened butter and granulated sugar together until it’s light and fluffy—about 2-3 minutes with a hand mixer. Scrape down the sides once. Add the egg and vanilla extract, then beat until just combined. Gradually add the dry ingredients to the wet, mixing on low speed until a soft dough forms. Don’t overmix, or your cookies will be tough. The dough should be soft but not sticky.
Step 2: Shape the Cookies
Scoop out tablespoon-sized portions of dough (about 15g each) and roll them into balls. Place them on your prepared baking sheets, spacing them about 2 inches apart. You don’t need to flatten them—they’ll spread as they bake. If you want perfectly round cookies, you can roll the balls a bit smoother. For a more rustic look (which honestly works better for mummies), leave them a little uneven.
Step 3: Bake the Cookies
Bake for 10-12 minutes, or until the edges are just barely golden. The centers will still look soft and slightly puffy—that’s exactly what you want. Overbaking makes them dry. Let them cool on the baking sheet for 5 minutes, then transfer to a cooling rack to cool completely. This is crucial: if you try to frost them while they’re even slightly warm, the frosting will slide right off. Ask me how I know.
Step 4: Prepare the Frosting
While the cookies cool, get your frosting ready. If you’re using store-bought, just give it a good stir to loosen it up. If it’s too thick to pipe, microwave it for 5 seconds (no more!) and stir again. Spoon the frosting into your piping bag or zip-top bag. Snip off a tiny corner—about ⅛ inch wide. You want a thin line, not a thick rope.
Step 5: Decorate the Mummies
This is the fun part. Take a cooled cookie and pipe zigzag lines across the top, going back and forth like you’re wrapping a bandage. Leave a small gap in the middle for the eyes. Don’t worry about perfection—mummies are supposed to look a little messy. Before the frosting sets, press two candy eyeballs into the gap. Press gently so they stick. Repeat with the remaining cookies.
Step 6: Add the Finishing Touch (Optional)
If you want that dusty, just-crawled-out-of-a-tomb look, lightly dust the frosted cookies with powdered sugar using a fine-mesh sieve. Go easy—you can always add more, but you can’t take it away.
Step 7: Let the Frosting Set
Let the cookies sit at room temperature for about 20-30 minutes so the frosting firms up. If you’re in a hurry, pop them in the fridge for 10 minutes. Once set, they’re ready to serve.
Cooking Tips & Techniques
I’ve made these cookies more times than I care to admit, and I’ve learned a few things along the way. Here are the tips that actually matter.
Don’t overbake. I know I said it already, but it bears repeating. Pull them out when the edges are just barely golden. The cookies will continue to set on the hot baking sheet. Overbaked cookies = dry, crumbly mummies. Nobody wants that.
Pipe with confidence. The first few cookies might look a little wonky—that’s normal. You’ll find your rhythm after the third one. Hold the piping bag at a 45-degree angle and move in quick, confident strokes. If you mess up? Just scrape off the frosting and try again. The cookie will be fine.
Use the right candy eyes. Some candy eyes are bigger than others. Look for the small ones (about ¼ inch wide). The giant eyes look comical, which isn’t necessarily bad, but the small ones give a cuter, more “mummy” vibe.
Keep the frosting at room temperature. If your kitchen is cold, the frosting might stiffen up in the piping bag. Just squeeze it a few times to warm it up, or run the bag under warm water for a few seconds (don’t get water inside the bag!).
Make ahead and decorate later. You can bake the cookies up to 3 days in advance and store them in an airtight container. Then decorate them the day of your party. The frosting needs about 24 hours to fully set, so if you’re stacking them, give them a full day to dry.
One mistake I made: The first time I tried these, I used a thick buttercream frosting and piped it with a star tip. It looked like a caterpillar, not a mummy. Stick with a thin, smooth frosting and a small round tip (or just a snipped bag corner). Trust me on this.
Variations & Adaptations
These mummy cookies are endlessly customizable. Here are a few ways to switch things up:
- Chocolate Mummies: Use a chocolate sugar cookie base instead of vanilla. The dark cookie contrasts beautifully with the white frosting wraps. Just swap ¼ cup of the flour for unsweetened cocoa powder.
- Gluten-Free Version: Substitute the all-purpose flour with a 1:1 gluten-free baking flour. I’ve tested this with Cup4Cup and King Arthur’s blend—both worked perfectly. Add an extra tablespoon of milk to the dough if it seems dry.
- Vegan Mummies: Use vegan butter (I like Miyoko’s), a flax egg (1 tablespoon ground flaxseed + 3 tablespoons water), and vegan frosting. The texture will be slightly different, but they’re still delicious.
- Spooky Spider Mummies: Instead of two eyes, use four small candy eyes in a cluster. Pipe eight tiny frosting legs coming out from under the wraps. Instant spider-mummy hybrid.
- Color-Changing Wraps: Tint your frosting with a drop of green or purple food coloring for a more Halloween-y vibe. Neon green wraps with red eyes? Creepy and adorable at the same time.
My personal favorite variation: I made a batch last year where I dipped the baked cookies in melted white chocolate instead of piping frosting. It gave them a smooth, shiny “bandage” look that was totally different from the traditional method. Plus, white chocolate hardens much faster than frosting, so you can eat them sooner. Just saying.
Serving & Storage Suggestions
These cookies are best served at room temperature. The frosting should be set but still slightly soft—that’s the sweet spot. Arrange them on a platter with some spider web pumpkin sugar cookies for a full Halloween spread that looks like you spent way more time than you actually did.
Storage: Store the decorated cookies in an airtight container at room temperature for up to 5 days. If you stack them, place a sheet of parchment paper between each layer to prevent the frosting from smudging. Do not refrigerate them—the fridge makes the cookies dry and the frosting can get tacky.
Freezer Instructions: You can freeze the undecorated cookies for up to 3 months. Just let them cool completely, then place them in a freezer-safe bag with the air squeezed out. When you’re ready to decorate, thaw them at room temperature for about 30 minutes, then frost as directed. The frozen cookies actually hold their shape really well.
Reheating: These are cookies, so you don’t really need to reheat them. But if you want that just-baked warmth, pop them in a 300°F oven for 3-4 minutes. Let them cool slightly before serving—warm frosting is a slippery situation.
Flavor Development: Honestly, these cookies taste even better the next day. The flavors meld together, and the texture softens just a bit. They’re perfect for making a day ahead of your Halloween party.
Nutritional Information & Benefits
Let’s be honest—these are cookies, not health food. But here’s the breakdown if you’re curious:
- Per cookie (1 mummy): Approximately 180 calories, 9g fat, 24g carbohydrates, 2g protein, 12g sugar.
- Health Highlights: The butter provides a small amount of vitamin A, and the egg adds a touch of protein. The vanilla extract has antioxidants (okay, a very tiny amount, but still).
- Dietary Considerations: This recipe contains dairy, eggs, and gluten. For a dairy-free version, use vegan butter and dairy-free frosting. For gluten-free, use a 1:1 gluten-free flour blend.
- Potential Allergens: Wheat, dairy, eggs. The candy eyes may contain soy or cornstarch—check the package if you have sensitivities.
My wellness perspective: Look, Halloween comes once a year. I’m not here to tell you to eat these every day. But if you’re going to have a treat, make it something that brings you joy. These cookies bring joy. And honestly, the portion control is built in—one or two of these little guys is plenty satisfying. Pair them with a pumpkin cream cold foam for the ultimate fall treat combo.
Conclusion
These adorable easy Halloween mummy sugar cookies are the kind of recipe that makes you look like a baking hero with almost zero effort. They’re cute, they’re fun to make, and they taste exactly like the soft, buttery sugar cookies you remember from childhood. Whether you’re making them for a classroom party, a Halloween gathering, or just because you want to do something silly on a Tuesday afternoon, they deliver every single time.
I love that this recipe lets you be creative without being complicated. You can go full spooky, keep it cute, or find your own weird middle ground. That’s the beauty of it. So grab your kids, your friends, or just yourself, and make some mummies. You won’t regret it.
If you try these, I want to hear about it. Leave a comment below, tag me in your photos, or tell me about your own cookie decorating disasters. And if you’re looking for more Halloween baking ideas, check out my poison apple black velvet Halloween bundt cake—it’s dark, dramatic, and perfect for a grown-up Halloween dessert table. Happy baking, friends!
Frequently Asked Questions
Can I use pre-made sugar cookie dough?
Absolutely. If you’re short on time, grab a tube of refrigerated sugar cookie dough from the store. Slice it, bake it, and decorate it the same way. The cookies might be a little thicker, but they’ll still taste great.
How do I keep the candy eyes from falling off?
Press the eyes into the frosting while it’s still wet. If your frosting has started to set, dab a tiny bit of fresh frosting on the back of each eye before pressing it on. That acts like glue.
Can I make these cookies ahead of time?
Yes! Bake the cookies up to 3 days in advance and store them in an airtight container. Decorate them the day before your event. The frosting needs about 24 hours to fully set, so they’re actually better the next day.
My frosting is too runny. What do I do?
If your frosting is too thin, add a tablespoon of powdered sugar at a time until it thickens up. If it’s too thick, add a few drops of milk. You want it to be pipeable but not watery—think toothpaste consistency.
Can I use royal icing instead of buttercream?
You can, but royal icing dries hard and crunchy. The soft buttercream gives a nicer texture contrast with the cookie. If you want a shiny, hard shell, go with royal icing. Just be aware it takes longer to dry and is a bit trickier to work with.
Pin This Recipe!

Adorable Easy Halloween Mummy Sugar Cookies

These adorable easy Halloween mummy sugar cookies are soft, slightly chewy, and decorated with simple white frosting wraps and candy eyes. They’re the perfect no-stress Halloween treat that looks impressive with minimal effort.
- Prep Time: 15 minutes
- Cook Time: 12 minutes
- Total Time: 30 minutes
- Yield: 24 cookies 1x
- Category: Dessert
- Cuisine: American
Ingredients
- 2 ½ cups (300g) all-purpose flour
- 1 cup (226g) unsalted butter, softened
- 1 cup (200g) granulated sugar
- 1 large egg, room temperature
- 1 teaspoon vanilla extract
- ½ teaspoon baking powder
- ¼ teaspoon salt
- 1 cup vanilla frosting (store-bought or homemade)
- 1 small bag (about 24-30) candy eyeballs
- 2 tablespoons powdered sugar (optional, for dusting)
Instructions
- Preheat oven to 350°F (175°C). In a medium bowl, whisk together flour, baking powder, and salt. Set aside.
- In a large bowl, beat softened butter and granulated sugar together until light and fluffy, about 2-3 minutes. Add egg and vanilla extract, beat until just combined.
- Gradually add dry ingredients to wet, mixing on low speed until a soft dough forms. Do not overmix.
- Scoop tablespoon-sized portions of dough (about 15g each) and roll into balls. Place on prepared baking sheets, spacing 2 inches apart.
- Bake for 10-12 minutes, until edges are just barely golden. Centers should still look soft and slightly puffy. Cool on baking sheet for 5 minutes, then transfer to a cooling rack to cool completely.
- While cookies cool, prepare frosting. Stir store-bought frosting to loosen, or microwave for 5 seconds if too thick. Spoon into a piping bag or zip-top bag and snip off a tiny corner (about ⅛ inch wide).
- Pipe zigzag lines across each cooled cookie, leaving a small gap in the middle for eyes. Before frosting sets, press two candy eyeballs into the gap.
- Optional: Lightly dust frosted cookies with powdered sugar using a fine-mesh sieve for a dusty look.
- Let cookies sit at room temperature for 20-30 minutes until frosting firms up, or refrigerate for 10 minutes.
Notes
Don’t overbake—cookies should be just barely golden at edges. Let cookies cool completely before frosting or frosting will slide off. For best results, use small candy eyes (about ¼ inch wide). Cookies can be baked up to 3 days in advance and stored in an airtight container. Frosting needs about 24 hours to fully set if stacking.
Nutrition
- Serving Size: 1 cookie
- Calories: 180
- Sugar: 12
- Sodium: 85
- Fat: 9
- Saturated Fat: 5
- Carbohydrates: 24
- Protein: 2
Keywords: Halloween cookies, mummy cookies, sugar cookies, easy Halloween treats, kid-friendly baking, no-chill cookies


