Love this? Save it for later!
Share the inspiration with your friends
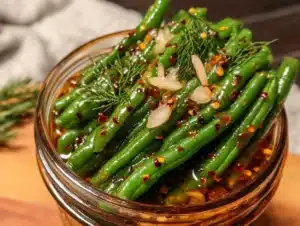
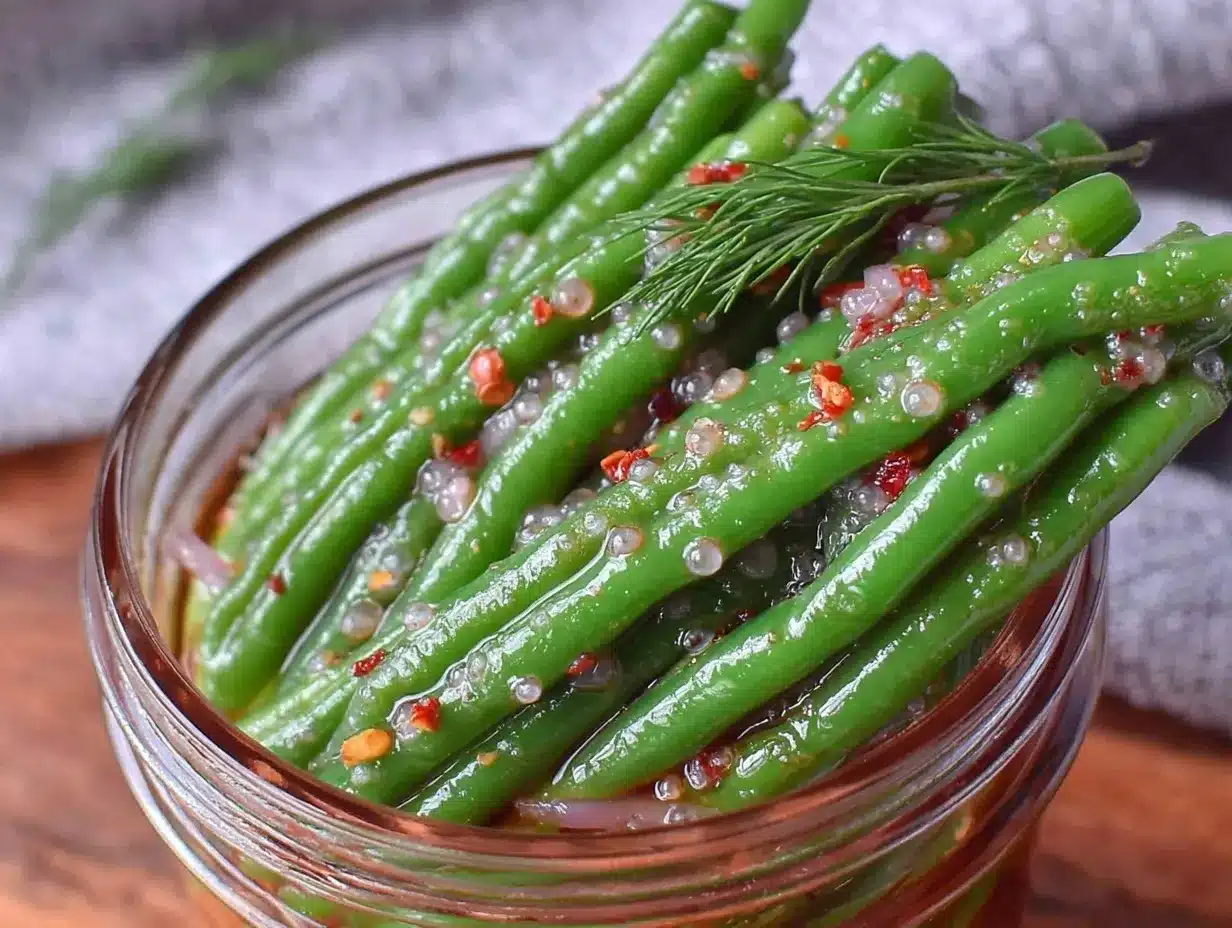
It was 11:37 PM on a random Tuesday, and I was hit with this sharp craving for something crunchy, spicy, and tangy all at once. The problem? No chips, no pretzels, no nuts—just a sad jar of green beans lurking in the back of my fridge. I didn’t have the usual pickling ingredients that a classic dilly bean recipe calls for, but I did have a handful of garlic cloves, some red pepper flakes, and a wild idea to toss those beans into a spicy, garlicky brine right then and there. Honestly, the late hour kind of broke the usual kitchen rules for me; I was mixing and matching flavors like a mad scientist, and the result was surprisingly addictive.
You know that feeling when you find a snack that just clicks—something that satisfies without weighing you down? Maybe you’ve been there, staring into your fridge late at night, willing something ordinary to transform into a midnight masterpiece. This Easy Spicy Garlic Dilly Beans recipe became my go-to after that impulsive night. It’s crisp, it’s tangy, and that garlic heat sneaks up on you in the best way. Plus, it’s ridiculously simple to whip up, even when your brain’s half asleep. Let me tell you, once you try this, you’ll keep coming back for that perfect bite of spicy, crunchy goodness—no late-night kitchen chaos required.
Why You’ll Love This Recipe
After testing this recipe multiple times (including during more sane hours), I can vouch for its charm and ease. It’s not just any dilly bean—it’s a snack that’s packed with personality and punch. Here’s why this recipe stands out:
- Quick & Easy: Ready to enjoy in under 24 hours, no weeks-long wait like traditional pickles.
- Simple Ingredients: Uses pantry basics and fresh garlic—no specialty stores needed.
- Perfect for Snacking: Great for late-night nibbles, cocktail parties, or a crunchy side to your favorite meals.
- Crowd-Pleaser: The balance of heat and tang keeps everyone reaching in for more, kids and adults alike.
- Unbelievably Flavorful: The garlic and dill combo with a spicy kick makes it anything but boring.
What makes this recipe different? It’s the technique of using a quick, hot vinegar brine infused with fresh garlic and crushed red pepper flakes, which keeps the beans crisp and bright. I mean, most recipes take forever or end up soggy—but this one nails that snap and spice every single time. Plus, it’s flexible—you can tweak the heat or garlic level to make it your own. Honestly, this recipe isn’t just a snack; it’s that little joy you crave when you need something more than just plain old veggies. If you want to impress guests or satisfy your own late-night cravings without fuss, these spicy garlic dilly beans are a must-try.
What Ingredients You Will Need
This recipe uses simple, fresh ingredients that pack a flavorful punch without any fancy fuss. Most of these are pantry staples, and you can easily substitute a few if needed.
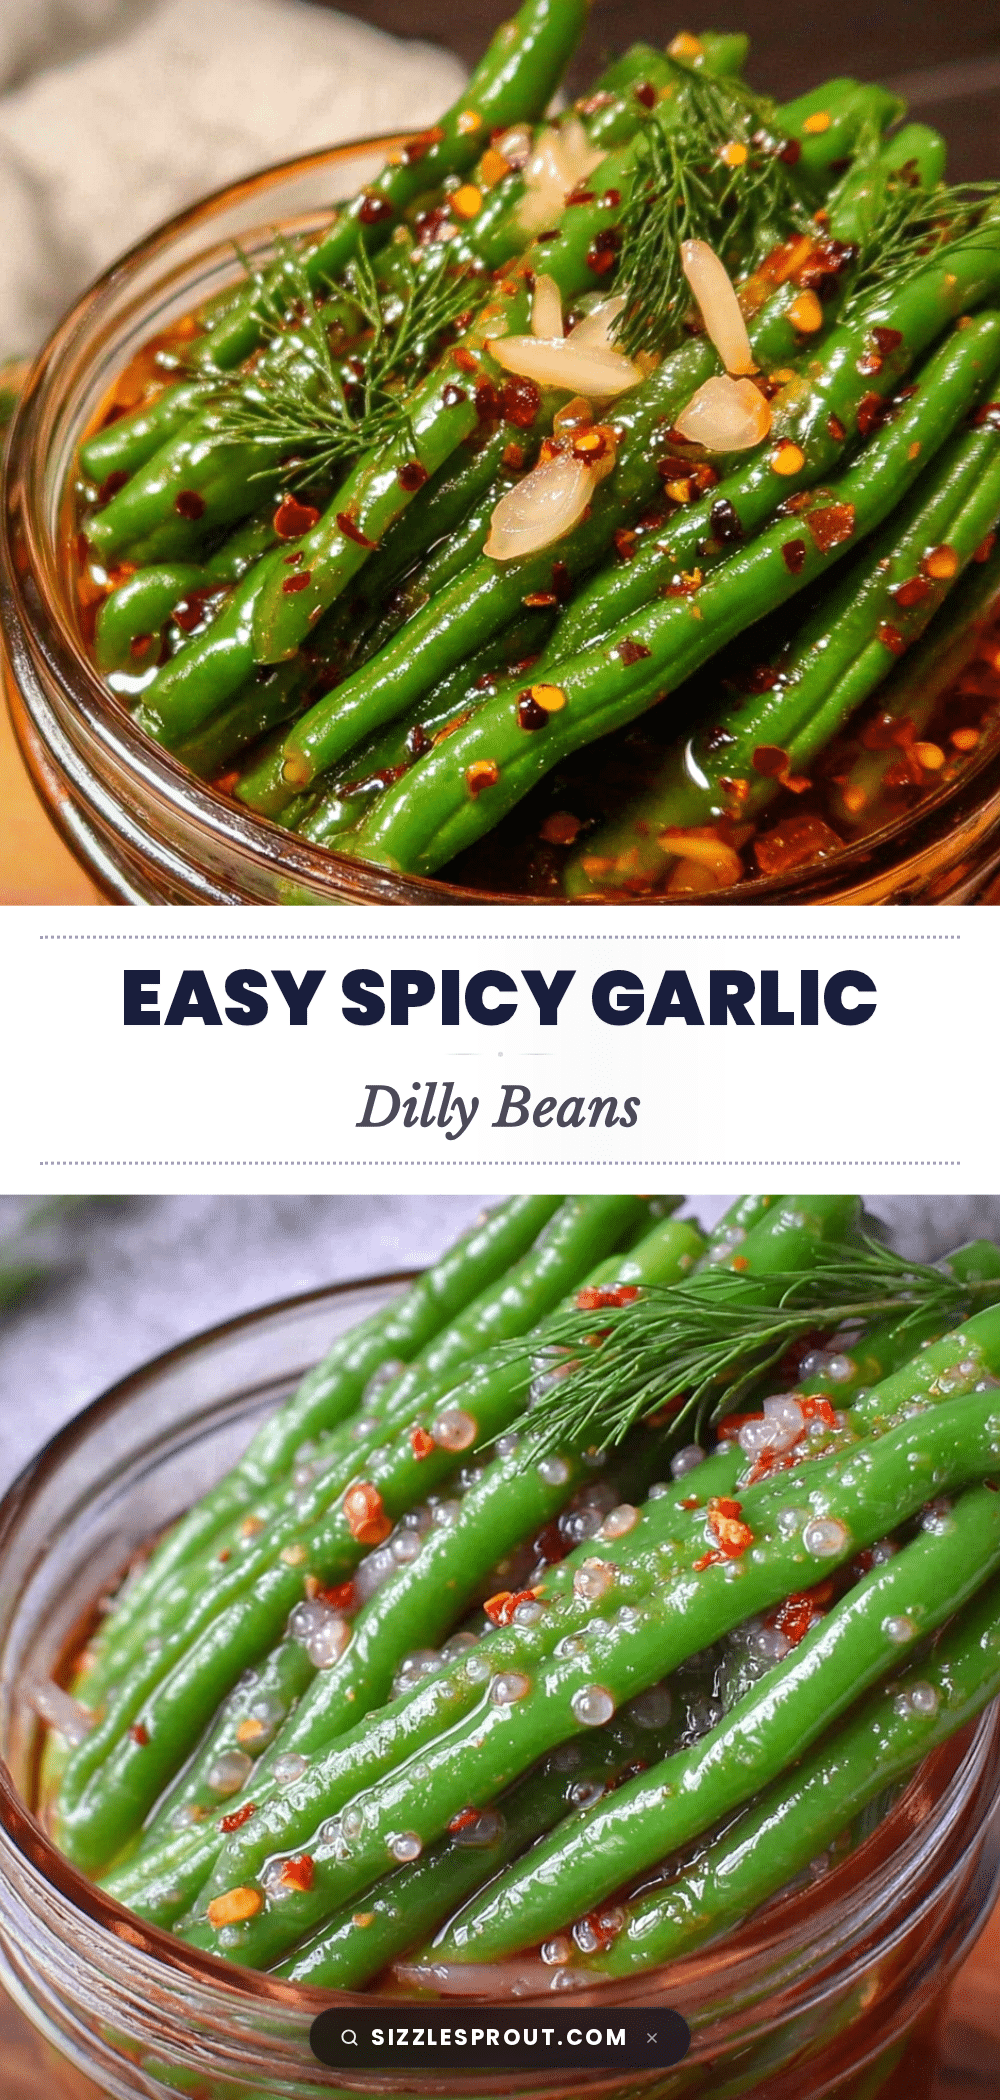
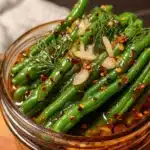
- Fresh green beans: About 1 pound (450g), washed and trimmed. Choose firm, crisp beans for the best crunch.
- Garlic cloves: 6-8 large, peeled and smashed (fresh garlic is key for that bold flavor).
- Fresh dill: 3-4 sprigs (or 1 tablespoon dried dill if fresh isn’t available).
- White vinegar: 1 cup (240ml), the acid that gives the brine its tang.
- Water: 1 cup (240ml), to balance out the vinegar’s strength.
- Sea salt: 1 tablespoon (use kosher or pickling salt to avoid additives).
- Granulated sugar: 1 teaspoon (optional, balances the heat and acidity).
- Red pepper flakes: 1-2 teaspoons, depending on your heat preference (I use 1.5 tsp for a nice kick).
- Black peppercorns: 1 teaspoon, whole for subtle spice.
- Mustard seeds: 1 teaspoon (adds a bit of warmth to the mix).
Ingredient tips: I like using Bragg’s apple cider vinegar for a slightly fruitier tang, but white vinegar works perfectly. If you want gluten-free, make sure your vinegar is certified gluten-free (most are). For a dairy-free snack, this recipe is naturally suitable.
Substitutions: If fresh dill isn’t your thing, tarragon or fennel fronds add a nice twist. Swap red pepper flakes with chopped fresh jalapeños for a different heat profile. And if you want to cut down on sugar, feel free to skip it entirely.
Equipment Needed
- Large pot or kettle: For boiling the brine and blanching the beans.
- Glass jars with lids: Two 16-ounce (475ml) jars work well. Mason jars are perfect here.
- Tongs or slotted spoon: To transfer the beans safely from boiling water to jars.
- Measuring cups and spoons: For precise brine preparation.
- Cutting board and knife: To trim and prep the beans and garlic.
If you don’t have glass jars, any clean, food-safe container with a tight lid will do. I once made this in a large glass mixing bowl with plastic wrap and transfered to smaller containers after the beans absorbed the brine—worked fine but jars keep the beans crisper longer.
Pro tip: Sterilize your jars by boiling them or running through the dishwasher to avoid any funky flavors or spoilage. If you’re short on equipment, a deep skillet and a sieve can substitute for a pot and tongs.
Preparation Method
- Prep the green beans: Rinse 1 pound (450g) of green beans under cold water. Trim the ends and discard. The beans should be fresh and crisp for the best crunch. This step takes about 5 minutes.
- Blanch the beans: Bring a large pot of water to a boil. Add the green beans and blanch for 2 minutes until bright green and slightly tender but still crisp. Remove with tongs and immediately plunge into an ice bath (bowl of ice water) to stop cooking. Drain well. This ensures your beans stay that perfect snap. (Tip: Don’t skip the ice bath unless you want mushy beans!)
- Prepare the brine: In the same pot, combine 1 cup (240ml) white vinegar, 1 cup (240ml) water, 1 tablespoon sea salt, and 1 teaspoon granulated sugar. Add 6-8 smashed garlic cloves, 3-4 fresh dill sprigs, 1-2 teaspoons red pepper flakes, 1 teaspoon black peppercorns, and 1 teaspoon mustard seeds. Bring to a rolling boil, stirring to dissolve salt and sugar. This takes about 5 minutes.
- Pack the jars: Carefully pack the blanched beans into two clean 16-ounce (475ml) glass jars. Divide the garlic, dill, and spices evenly between the jars for even flavor.
- Pour the brine: Pour the hot brine over the beans in each jar, making sure the beans are fully submerged. Leave about 1/2 inch (1.25 cm) of headspace at the top. Use a clean utensil to remove any air bubbles by gently pressing the beans down.
- Seal and cool: Screw on the lids tightly. Let the jars cool to room temperature (about 1 hour), then refrigerate. The beans will be ready to enjoy after 24 hours but taste even better after 48 hours.
- Storage note: Keep the jars refrigerated and consume within 2 weeks for peak freshness and crunch.
Watch out for overcooking the beans in step 2—they should still resist a bite. Also, be gentle when packing the jars to prevent bruising. The bright green color is your first clue you’re on the right track.
Cooking Tips & Techniques
Getting the perfect spicy garlic dilly beans is about balancing timing, temperature, and texture. Here are some tips I picked up after a few trial-and-error sessions (and a few messy jars):
- Don’t skip the ice bath: It sets the beans’ color and crunch. I learned this the hard way when I ended up with limp beans once.
- Use fresh garlic: It really makes the flavor pop. Dried garlic powder just won’t do the job here.
- Adjust the heat slowly: If you’re new to spicy food, start with 1 teaspoon of red pepper flakes and add more next time.
- Pack jars firmly but gently: Too tight and you bruise the beans; too loose and they might float out of the brine.
- Check your salt: Use pickling or kosher salt to avoid bitterness from additives found in table salt.
- Multi-task: While the brine heats, prep your veggies to save time.
Honestly, the biggest lesson was patience. Letting the beans sit in the fridge for at least 24 hours brings all the flavors together beautifully. You’ll know they’re ready when the garlic aroma fills the jar and the beans taste lively but balanced.
Variations & Adaptations
This recipe is pretty versatile, so you can easily switch things up based on your pantry or mood:
- Heat level: Swap red pepper flakes with fresh sliced jalapeños or use smoked paprika for a milder, smoky twist.
- Herbs: Instead of dill, try fresh thyme or rosemary for a different herbal note.
- Pickling style: Use apple cider vinegar instead of white vinegar for a fruitier, less sharp tang.
- Garlic variation: Roasted garlic cloves can add a mellow, sweet flavor in place of fresh smashed.
- Low-sodium: Reduce salt by half and add a splash of lemon juice for brightness.
One time, I made a batch with a handful of cherry tomatoes and sliced onions for a little extra zing. It didn’t last long in the fridge! Feel free to experiment and find your favorite spin on these spicy garlic dilly beans.
Serving & Storage Suggestions
These beans are best served chilled or at room temperature. I like to pull a jar out of the fridge when I’m craving a crunchy, flavorful snack that’s not too heavy. They also make a fantastic tangy side with grilled meats or sandwiches.
Try pairing them with a crispy garlic chicken or alongside a charcuterie board for a surprising pop of spice and freshness. They also go well with creamy cheeses or hearty rye bread.
For storage, keep the sealed jars in the refrigerator. They stay crisp and tasty for up to two weeks. When reheating isn’t needed since they’re meant to be a cold snack, but if you want to warm them slightly, let them sit out for 15-20 minutes to soften the chill without losing crunch.
Flavors deepen over time—if you can wait beyond 48 hours, the beans develop a richer, more integrated taste. Just don’t let them linger too long or they’ll get too soft.
Nutritional Information & Benefits
One serving of these spicy garlic dilly beans (about 1/2 cup or 120g) contains approximately:
| Calories | 35 |
|---|---|
| Protein | 2g |
| Carbohydrates | 6g (1g sugar) |
| Fat | 0g |
| Fiber | 2g |
| Sodium | 450mg (variable by salt used) |
These beans are a low-calorie, fiber-rich snack with antioxidants from garlic and vitamin C from fresh green beans. The vinegar supports digestion, and the capsaicin in red pepper flakes may help boost metabolism. They’re naturally gluten-free and suitable for vegan and paleo diets.
From a wellness perspective, I appreciate how this snack satisfies cravings without guilt or processed junk. It’s a solid way to sneak in more veggies with a bold flavor punch.
Conclusion
If you’re looking for a snack that’s crisp, spicy, garlicky, and downright addictive, these Easy Spicy Garlic Dilly Beans are your new best friend. They come together quickly, use simple ingredients, and pack a flavorful punch that keeps you reaching back for more. Feel free to customize the heat, herbs, or vinegar to suit your taste.
Personally, I keep a jar in my fridge at all times—it’s my go-to for that late-night crunch or a tangy side at dinner. Give this recipe a try, and share your own twists! I’d love to hear how you make these beans your own. Go ahead, treat yourself to a snack that’s anything but ordinary.
Frequently Asked Questions
How long do spicy garlic dilly beans last in the fridge?
They keep well for up to two weeks when properly refrigerated in sealed jars. For best crunch and flavor, consume within 10-14 days.
Can I use frozen green beans for this recipe?
Fresh green beans are best for crunch, but you can use frozen. Just thaw and pat dry thoroughly before blanching and pickling.
Is it necessary to blanch the beans before pickling?
Yes, blanching brightens the color and softens the beans slightly without losing crispness, which helps them absorb the brine better.
Can I make this recipe without garlic?
Garlic is key to the flavor here, but if you must skip it, add extra dill and a pinch of onion powder to compensate.
How spicy are these dilly beans?
The heat mostly comes from red pepper flakes. Using 1-2 teaspoons gives a noticeable but balanced kick. Adjust to your spice tolerance.
Pin This Recipe!
Easy Spicy Garlic Dilly Beans Recipe Perfect for a Flavorful Snack
A quick and easy recipe for spicy, crunchy dilly beans infused with garlic and dill, perfect for a flavorful snack or side dish.
- Prep Time: 10 minutes
- Cook Time: 7 minutes
- Total Time: 24 hours (including resting time)
- Yield: 2 jars (about 4 servings) 1x
- Category: Snack
- Cuisine: American
Ingredients
- 1 pound (450g) fresh green beans, washed and trimmed
- 6–8 large garlic cloves, peeled and smashed
- 3–4 sprigs fresh dill (or 1 tablespoon dried dill)
- 1 cup (240ml) white vinegar
- 1 cup (240ml) water
- 1 tablespoon sea salt (kosher or pickling salt recommended)
- 1 teaspoon granulated sugar (optional)
- 1–2 teaspoons red pepper flakes (1.5 tsp recommended)
- 1 teaspoon whole black peppercorns
- 1 teaspoon mustard seeds
Instructions
- Rinse 1 pound (450g) of green beans under cold water. Trim the ends and discard. This takes about 5 minutes.
- Bring a large pot of water to a boil. Add the green beans and blanch for 2 minutes until bright green and slightly tender but still crisp. Remove with tongs and immediately plunge into an ice bath to stop cooking. Drain well.
- In the same pot, combine 1 cup white vinegar, 1 cup water, 1 tablespoon sea salt, and 1 teaspoon granulated sugar. Add 6-8 smashed garlic cloves, 3-4 fresh dill sprigs, 1-2 teaspoons red pepper flakes, 1 teaspoon black peppercorns, and 1 teaspoon mustard seeds. Bring to a rolling boil, stirring to dissolve salt and sugar. This takes about 5 minutes.
- Carefully pack the blanched beans into two clean 16-ounce (475ml) glass jars. Divide the garlic, dill, and spices evenly between the jars.
- Pour the hot brine over the beans in each jar, making sure the beans are fully submerged. Leave about 1/2 inch (1.25 cm) of headspace at the top. Remove any air bubbles by gently pressing the beans down.
- Screw on the lids tightly. Let the jars cool to room temperature (about 1 hour), then refrigerate. Beans will be ready after 24 hours but taste better after 48 hours.
- Keep the jars refrigerated and consume within 2 weeks for peak freshness and crunch.
Notes
Do not skip the ice bath after blanching to keep beans crisp. Use fresh garlic for best flavor. Adjust red pepper flakes to control heat. Sterilize jars before use to avoid spoilage. Consume within two weeks for best quality.
Nutrition
- Serving Size: About 1/2 cup (120g)
- Calories: 35
- Sugar: 1
- Sodium: 450
- Carbohydrates: 6
- Fiber: 2
- Protein: 2
Keywords: spicy dilly beans, garlic dilly beans, pickled green beans, quick pickles, spicy snack, garlic snack, easy dilly beans