Love this? Save it for later!
Share the inspiration with your friends
Introduction
It was 11:17 PM on a quiet Wednesday, and I was hit with one of those weird, unstoppable cravings for something nostalgic but with a twist. I didn’t have those perfectly sealed, store-bought Uncrustables in the fridge (which honestly, I don’t even fully trust), but I had a loaf of bread, a jar of peanut butter, and a fridge full of random spreads that begged for a little late-night experimentation. So, I grabbed a cookie cutter, figured “why not?”, and set out to make my own version of homemade Uncrustables. No fancy tools, no fuss — just a little midnight impulse and the freedom that comes with cooking when the rest of the world is asleep.
The first batch was a little messy, my kitchen counter looked like a war zone of peanut butter smudges, and I might’ve forgotten to close one sandwich properly. But the taste? Spot on. That soft, sealed pocket of peanut butter and jelly goodness was even better because I made it myself. Since then, I’ve played around with four different flavor variations, each one bringing a new kind of comfort. Honestly, this recipe stuck with me because it’s simple, customizable, and perfect for anyone who’s ever craved that childhood classic but wanted to keep it real and homemade.
Maybe you’ve been there too — standing in the kitchen late at night, the fridge door open, wondering what to whip up that feels both easy and a little special. That’s why this Easy DIY Homemade Uncrustables recipe might just become your favorite go-to. Let me tell you, it’s worth the little mess and the midnight timer check.
Why You’ll Love This Recipe
This homemade Uncrustables recipe has been tested time and time again — from rushed weekday lunches to lazy weekend snacks. I’ve learned a thing or two, and so will you after a few tries. Here’s why this recipe stands out:
- Quick & Easy: Comes together in about 15 minutes, perfect for those last-minute lunchbox rescues or unexpected guests.
- Simple Ingredients: Pantry staples and fridge basics you probably already have—no need for special trips.
- Perfect for On-the-Go: Great snack for school, work, road trips, or even a picnic in the park.
- Crowd-Pleaser: Kids and adults alike love these sealed sandwiches, and you can customize flavors to keep everyone happy.
- Unbelievably Delicious: The sealed edges lock in freshness and mess-free eating, with a soft, tender bread texture that’s way better than store-bought.
What makes this recipe really different? It’s the freedom to experiment. I’ve tried everything from classic peanut butter and jelly to cream cheese and fruit spreads, and swapping out regular white bread for whole wheat or gluten-free options. Plus, sealing the edges with a cookie cutter—not just a knife—makes these sandwiches not only functional but fun. This isn’t your standard lunchbox filler; it’s a little pocket of joy you can tailor to your mood and pantry.
Honestly, after the first bite, you’ll probably close your eyes and get that warm, comfort-food feeling that only homemade can deliver. It’s simple, satisfying, and ready to become a staple in your snack arsenal.
What Ingredients You Will Need
This recipe uses straightforward ingredients that come together to create a soft, sealed sandwich with a flavorful filling inside. Most of these are pantry staples, but I’ve included some tips for substitutions and seasonal swaps to keep it fresh and flexible.
- Sliced Bread: White, whole wheat, or gluten-free bread works well. I prefer Nature’s Own for its softness and texture, but any sandwich bread without big holes will do.
- Peanut Butter: Creamy or chunky, depending on your texture preference. I like Skippy Natural for its balance of flavor and spreadability.
- Jelly or Jam: Classic grape or strawberry are winners, but raspberry or apricot jam can add a nice twist. Use seedless varieties for smoother sealing.
- Cream Cheese: Softened, plain or flavored (like chive or strawberry) — great for a tangy variation.
- Honey or Nutella: Perfect for a sweet drizzle if you want a little something extra inside your sandwich.
- Fresh Fruit: Thinly sliced strawberries, bananas, or apples can be added for freshness and texture.
- Butter or Margarine: Optional, to spread on the bread for a richer taste and to help seal the edges better.
Seasonal tip: During summer, I love swapping jelly for fresh crushed berries mixed with a bit of honey—that adds a burst of freshness and a natural sweetness. Also, if you’re catering to dietary needs, almond butter or sunflower seed butter works great as peanut butter alternatives, especially if someone has allergies.
Equipment Needed
Making these homemade Uncrustables is surprisingly simple in terms of gear. Here’s what you’ll want on hand:
- Round Cookie Cutter (about 3 to 4 inches diameter): This is your magic tool for sealing sandwiches into neat little pockets. If you don’t have one, a wide-mouth glass or cup can work.
- Butter Knife or Small Spreader: For spreading peanut butter, cream cheese, or any filling evenly.
- Cutting Board: To protect your counters while you work.
- Baking Sheet or Plate: For laying out the finished sandwiches before storing or freezing.
- Plastic Wrap or Airtight Container: To keep sandwiches fresh if you’re not eating them right away.
I’ve tried making these with fancy sandwich presses before, but honestly, the cookie cutter method is faster and requires less cleanup. Plus, you get a cute, uniform shape every time. For budget-friendly kitchens, a sturdy glass works just fine as a cutter substitute, but it’s worth investing in a cookie cutter if you plan to make these often.
Preparation Method
- Prepare Your Ingredients (5 minutes): Take your bread slices out and lay them flat on the cutting board. Soften any cream cheese or butter if you’re using them. Have your spreads ready to go.
- Spread the First Layer (3 minutes): Use your butter knife to evenly spread peanut butter (or your chosen base) on one slice of bread. Keep the spread about ¼ inch from the edges to avoid overflow.
- Add the Filling (3 minutes): Spoon your jelly, jam, or fruit slices on top of the peanut butter layer. For cream cheese variations, spread cream cheese first, then add fruit or honey. Avoid overfilling to prevent leaks.
- Top with Second Slice (1 minute): Place the second slice of bread on top, aligning edges carefully.
- Seal the Sandwich (5 minutes): Press your round cookie cutter firmly into the sandwich, cutting through both layers. Then, press down on the edges with the cutter or your fingers to seal the sandwich tightly. This step traps the filling inside and creates that classic Uncrustables look.
- Remove Excess Bread (1 minute): Peel away the crusts and discard or save for breadcrumbs. Check the edges and press firmly again if needed.
- Repeat for Remaining Sandwiches: Lay finished sandwiches on a baking sheet or plate. If you’re making ahead, wrap each sandwich tightly in plastic wrap.
- Storage (Optional): Pop the wrapped sandwiches in the freezer for up to 3 months. Let thaw for about 30 minutes at room temperature before eating.
Pro tip: If you find the bread is too soft and tearing during cutting, try refrigerating it for 10 minutes first — it firms up and cuts cleaner. Also, watch out for overfilling; a little less is more when sealing. You want that perfect balance of filling and bread.
Cooking Tips & Techniques
Making homemade Uncrustables might seem straightforward, but a few tips can really make your sandwiches shine.
- Choose the Right Bread: Go for fresh, soft sandwich bread without big air pockets. Too fresh and soft can get mushy; slightly day-old bread often holds up better.
- Spread Evenly: Avoid clumps of peanut butter or jelly; smooth, even layers help with sealing and prevent leaks.
- Seal Like a Pro: Use firm pressure with your cookie cutter, then press the edges with your fingers or a fork to secure the seal completely.
- Freeze for Longer Storage: Homemade Uncrustables freeze beautifully. Just wrap well to avoid freezer burn and thaw gently.
- Mess Control: Keep paper towels nearby for those inevitable peanut butter smudges (trust me, I learned the hard way).
I once tried skipping the sealing step thinking the bread would hold, but it ended up a gooey mess — lesson learned! Also, multitasking by prepping multiple sandwiches at once saves loads of time. And if you ever want a crunchier bite, toast the sandwich lightly before sealing.
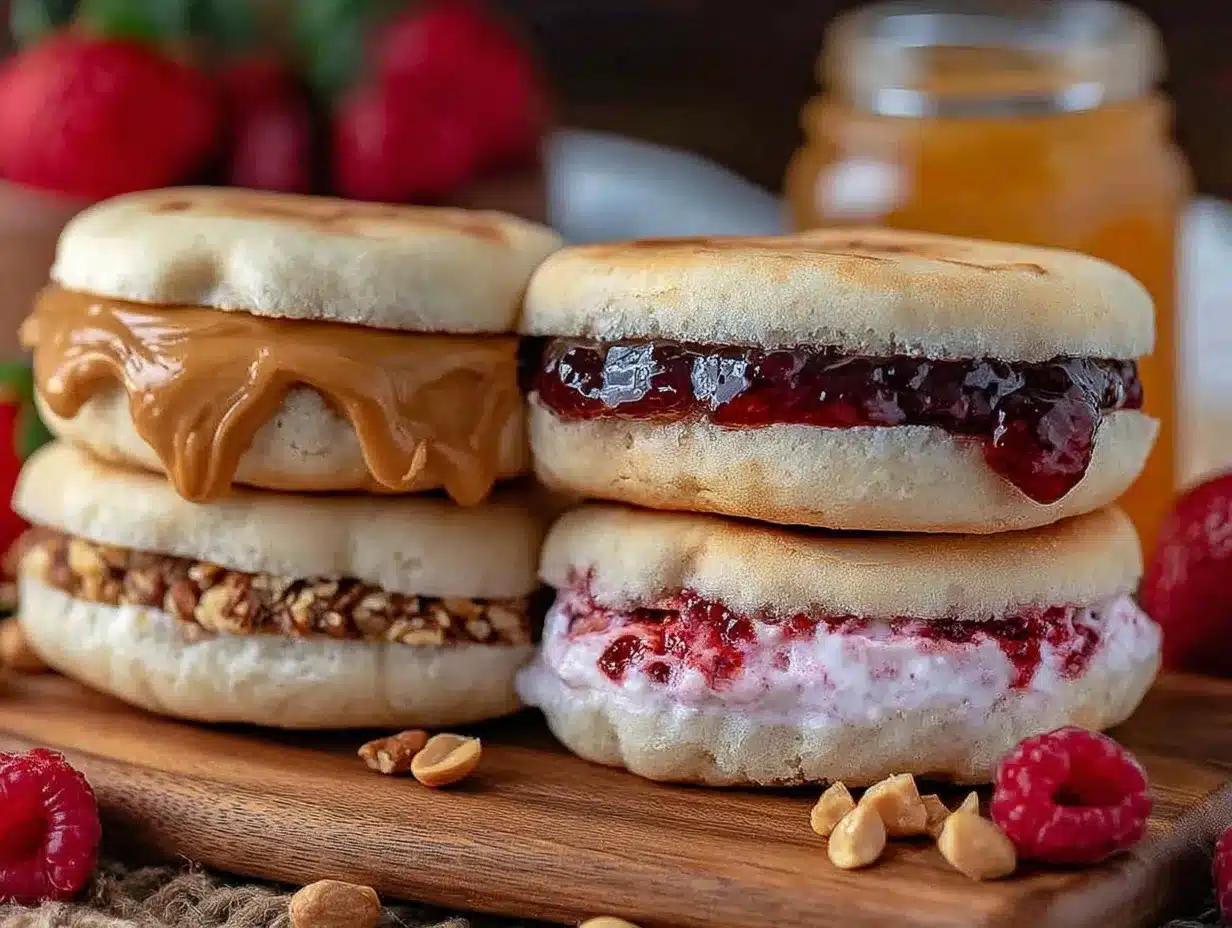
Variations & Adaptations
One of the best things about this recipe is how easy it is to change things up to suit your mood or dietary needs. Here are my favorite twists:
- Classic PB&J: The original — creamy peanut butter with grape jelly. Simple and timeless.
- Cream Cheese & Strawberry: Softened cream cheese with fresh strawberry slices or strawberry jam for a slightly tangy, sweet filling.
- Nutella & Banana: For chocolate lovers, spread Nutella and add thin banana slices for a dreamy combo.
- Sunflower Butter & Honey: Allergy-friendly and naturally sweet, sunflower seed butter with a drizzle of honey.
If you want to change the bread, whole wheat adds a nuttier flavor, while gluten-free bread works well for sensitive diets. For a savory take, try cream cheese with chopped herbs and thin cucumber slices — a little unconventional but surprisingly delicious. I once made a batch with almond butter and raspberry jam that got rave reviews from friends who usually avoid peanut butter.
Serving & Storage Suggestions
These homemade Uncrustables are best served at room temperature or slightly chilled. They’re perfect for packing in lunchboxes, picnic baskets, or as an easy snack for after school.
- Serving Tips: Pair with fresh fruit, a small salad, or crunchy veggie sticks for a balanced meal.
- Storage: Store wrapped sandwiches in an airtight container in the fridge for up to 3 days. For longer storage, freeze wrapped sandwiches individually for up to 3 months.
- Reheating: Thaw frozen sandwiches at room temperature for 20-30 minutes before eating. If you like, toast lightly in a skillet or toaster oven for a warm, melty treat.
- Flavor Development: Letting frozen sandwiches thaw slowly overnight in the fridge can help flavors meld beautifully, especially with cream cheese or fresh fruit fillings.
Nutritional Information & Benefits
Each homemade Uncrustable varies by filling and bread choice, but here’s a general snapshot for a classic peanut butter and jelly sandwich made with white bread:
- Calories: Approximately 250-300 per sandwich
- Protein: 8-10 grams (thanks to peanut butter)
- Carbohydrates: 30-35 grams
- Fat: 10-15 grams (mostly healthy fats from nuts)
Key benefits include protein and healthy fats from peanut butter, plus vitamins and antioxidants from fruit spreads or fresh fruit variations. Using whole wheat or gluten-free bread can modify fiber and carb content to suit dietary needs. Just watch allergies — peanut butter is a common allergen, so sunflower or almond butter are great substitutes. I’ve found this recipe balances convenience with wholesome ingredients, making homemade Uncrustables a smarter choice compared to many processed snacks.
Conclusion
This Easy DIY Homemade Uncrustables recipe is one of those simple pleasures that proves homemade can be just as quick and way more satisfying than store-bought. Whether you stick with the classic peanut butter and jelly or try one of the four delicious flavor variations, these sealed sandwiches are a fun, mess-free way to enjoy a nostalgic favorite with your own personal twist.
Feel free to get creative, swap ingredients, and make the recipe your own. I love how these little pockets of yum have become a staple in my kitchen — they’re just plain good and bring a smile every time. So, go ahead, roll up your sleeves, grab that cookie cutter, and make some magic happen.
If you try this recipe, I’d love to hear about your favorite flavor combo or any clever twists you come up with — drop a comment below and share your story!
Frequently Asked Questions
Can I use gluten-free bread for homemade Uncrustables?
Absolutely! Just make sure the bread is soft and sliceable to get a good seal. Some gluten-free breads are drier, so refrigerating them before cutting helps.
How do I keep the sandwiches from leaking?
Use moderate amounts of filling and press the edges firmly with your cookie cutter or fingers to create a tight seal. Avoid spreading filling right up to the edge.
Can I freeze homemade Uncrustables?
Yes, they freeze very well. Wrap each sandwich individually in plastic wrap and store in an airtight container or freezer bag for up to 3 months.
What’s the best way to thaw frozen Uncrustables?
Leave them at room temperature for 20-30 minutes or thaw overnight in the fridge. You can also toast them lightly for a warm treat.
Are there savory versions of Uncrustables?
Definitely! Try cream cheese with herbs and cucumber, or turkey and cheese with mustard for a savory twist that’s just as easy to make.
Pin This Recipe!
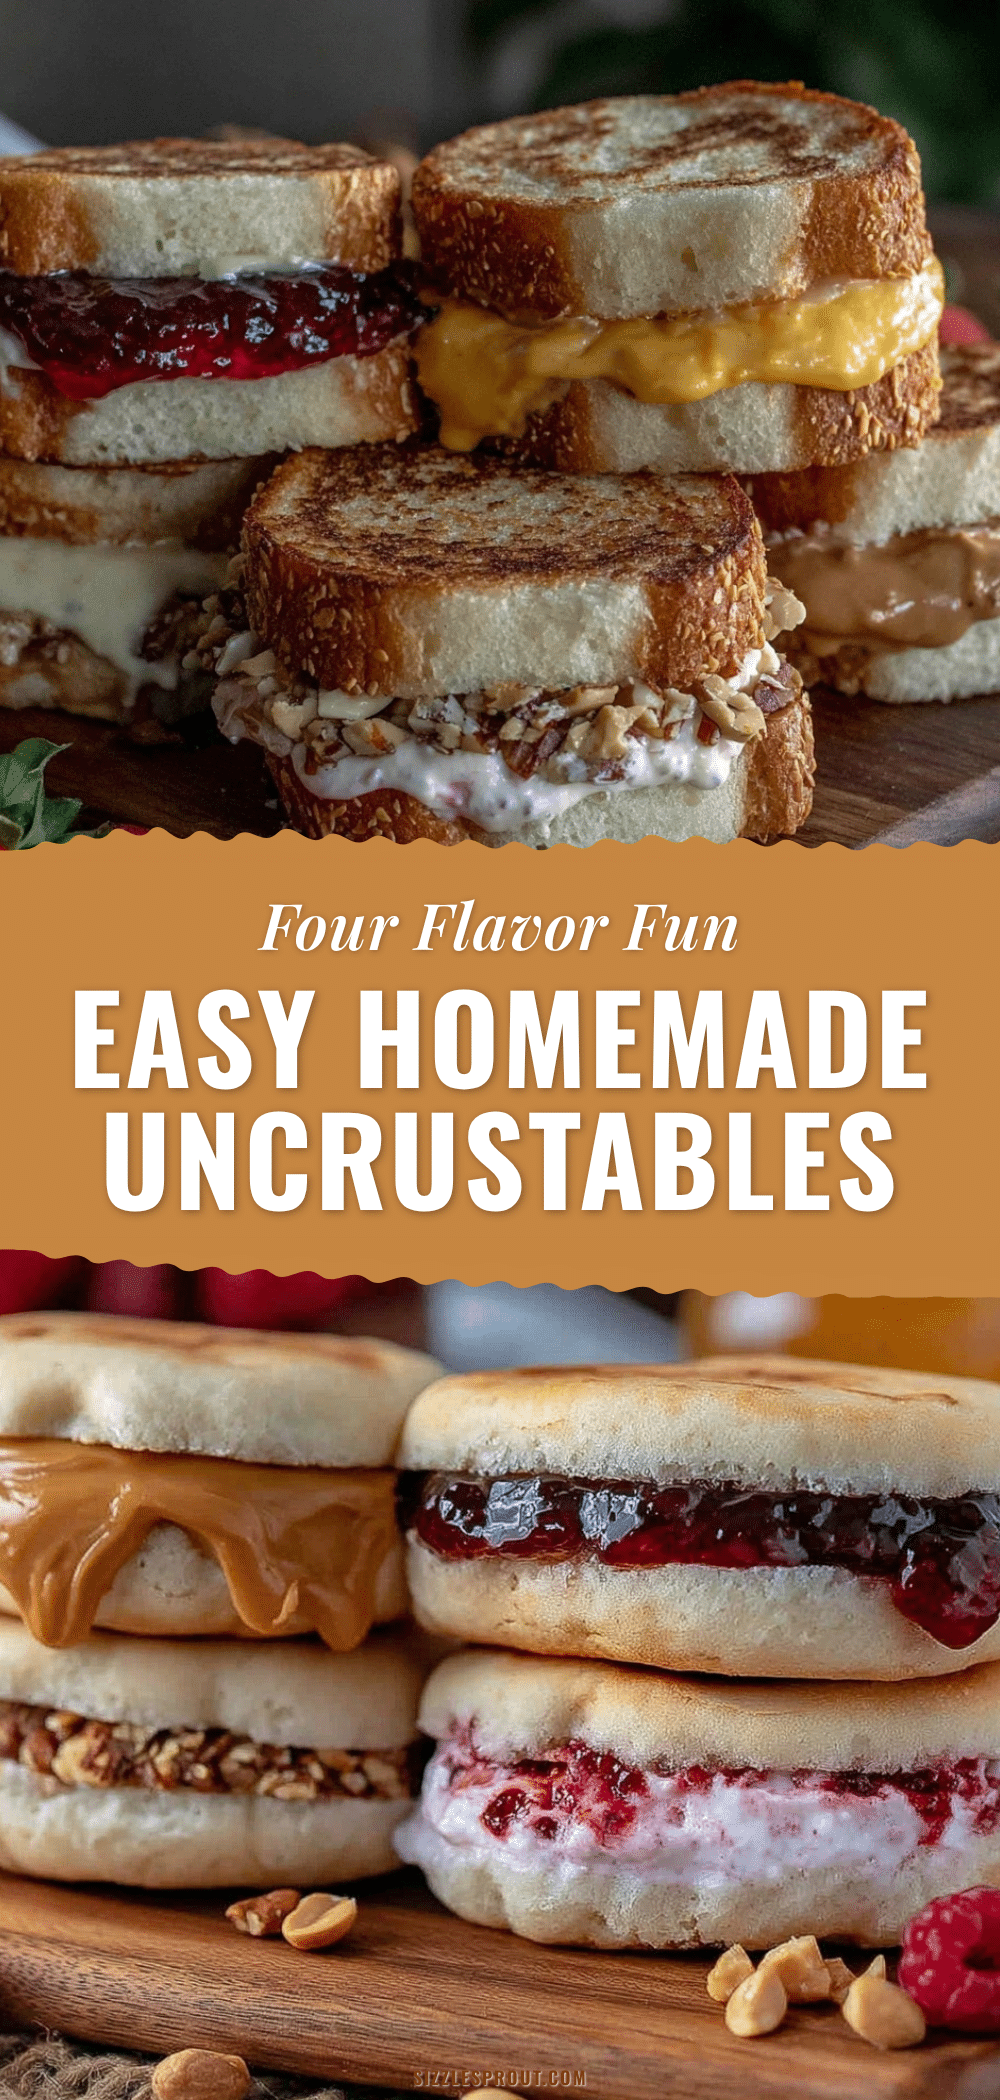
Easy DIY Homemade Uncrustables Recipe with 4 Delicious Flavor Variations

A simple, customizable recipe for homemade Uncrustables sandwiches with four tasty flavor variations, perfect for quick snacks or lunchboxes.
- Prep Time: 10 minutes
- Cook Time: 0 minutes
- Total Time: 10 minutes
- Yield: 4 sandwiches
- Category: Snack
- Cuisine: American
Ingredients
- Sliced bread (white, whole wheat, or gluten-free)
- Peanut butter (creamy or chunky)
- Jelly or jam (grape, strawberry, raspberry, apricot – seedless preferred)
- Cream cheese (softened, plain or flavored)
- Honey or Nutella (optional for sweet drizzle)
- Fresh fruit (thinly sliced strawberries, bananas, or apples)
- Butter or margarine (optional, for spreading and sealing edges)
Instructions
- Prepare your ingredients by laying bread slices flat and softening cream cheese or butter if using.
- Spread peanut butter or chosen base evenly on one slice of bread, keeping about 1/4 inch from edges.
- Add jelly, jam, or fruit slices on top of the peanut butter layer. For cream cheese variations, spread cream cheese first, then add fruit or honey.
- Place the second slice of bread on top, aligning edges carefully.
- Press a round cookie cutter (3-4 inches diameter) firmly into the sandwich, cutting through both layers.
- Press down on the edges with the cutter or fingers to seal the sandwich tightly.
- Remove excess crust and discard or save for breadcrumbs. Press edges again if needed.
- Repeat for remaining sandwiches and lay them on a baking sheet or plate.
- Wrap each sandwich tightly in plastic wrap if storing.
- Freeze wrapped sandwiches for up to 3 months if desired. Thaw for about 30 minutes at room temperature before eating.
Notes
If bread is too soft and tears during cutting, refrigerate for 10 minutes first. Avoid overfilling to prevent leaks. Freeze wrapped sandwiches for up to 3 months. Thaw at room temperature or overnight in fridge. Toast lightly for a warm treat. Use firm pressure when sealing edges.
Nutrition
- Serving Size: 1 sandwich
- Calories: 275
- Sugar: 8
- Sodium: 250
- Fat: 12
- Saturated Fat: 2
- Carbohydrates: 32
- Fiber: 2
- Protein: 9
Keywords: Uncrustables, homemade sandwiches, peanut butter and jelly, easy snacks, lunchbox ideas, DIY Uncrustables, kid-friendly snacks