Love this? Save it for later!
Share the inspiration with your friends
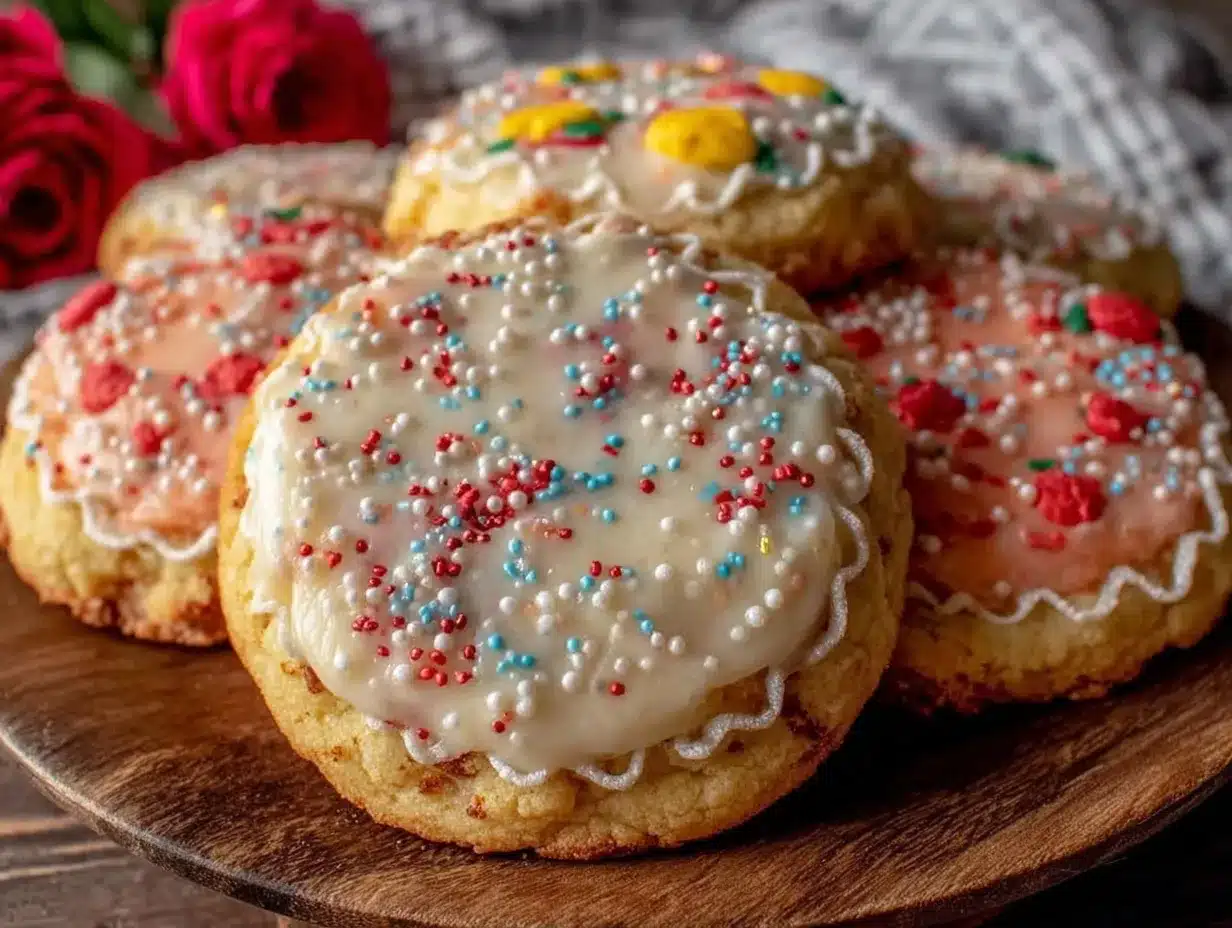
The sun was just starting to peek through the kitchen window last Wednesday when the unmistakable scent of vanilla and cinnamon hit me — and suddenly I was 9 years old, sitting cross-legged on the cold tile floor at Mrs. Dalloway’s kitchen table. She was the quirky neighbor with paint-splattered jeans and a smile that never quit, and those giant sugar cookies she baked for every first day of school were legendary in our little cul-de-sac. I remember the way the dough felt under my fingers — cool, soft, and a little sticky — and how the cookies, once baked, were so huge they barely fit in the Tupperware container. Their edges were perfectly crisp but the centers stayed tender, and the frosting? Oh, the frosting was a smooth, sweet canvas waiting for my clumsy attempts at decorating with sprinkles and food coloring.
I honestly forgot a key ingredient once (probably the baking powder, because I was too busy chatting with Mrs. Dalloway about my new backpack), and the cookies didn’t rise the way they should. But the way those imperfect, giant sugar cookies tasted was still unforgettable — like a warm, sweet hug on a nervous morning. Maybe you’ve been there, trying to capture that same excitement and comfort for your own kids or even yourself as you head back to school or work after the summer haze. That’s why I keep making this exact recipe. It’s not just about the cookie; it’s about recreating that moment of anticipation, the sticky fingers, and the joy of a giant, decorated treat that says, “You’ve got this.”
Why You’ll Love This Recipe
Honestly, I’ve tried a dozen sugar cookie recipes over the years, but this one stands out for a few reasons. It’s a real crowd-pleaser that’s perfect for the first day of school — whether you’re packing lunchboxes or hosting a little celebration. Here’s why it’s become my go-to:
- Quick & Easy: Comes together in under an hour, making it perfect for busy mornings or last-minute baking sessions.
- Simple Ingredients: Uses pantry staples — no need to hunt down fancy or obscure items.
- Perfect for Special Occasions: These cookies shine during back-to-school parties, classroom treats, or even as a fun weekend project.
- Crowd-Pleaser: Kids and adults alike love the giant size and fun decorated tops — it’s like the cookie version of a little celebration.
- Unbelievably Delicious: The balance of a tender yet sturdy sugar cookie base with smooth, colorful royal icing is just spot on.
What really makes this recipe different? The magic is in the dough’s texture — thanks to a perfectly measured ratio of butter to sugar — and the royal icing that dries smooth and shiny but isn’t too hard. Plus, I’ve tweaked the decorating steps so even if you don’t consider yourself an artist, your cookies will look like they came from a bakery. It’s comfort food that brings a little sparkle to an ordinary morning. And honestly, that’s why I keep coming back to it.
What Ingredients You Will Need
This recipe uses simple, wholesome ingredients to deliver bold flavor and satisfying texture without the fuss. Most are pantry staples, and substitutions are easy if needed.
- For the Cookie Dough:
- 2 ¾ cups (345 g) all-purpose flour (I recommend King Arthur Flour for best texture)
- 1 teaspoon baking powder
- ½ teaspoon salt
- 1 cup (227 g) unsalted butter, softened (room temperature for easy mixing)
- 1 ½ cups (300 g) granulated sugar
- 1 large egg, room temperature
- 1 teaspoon pure vanilla extract (quality vanilla makes a difference)
- 2 tablespoons whole milk (adds tenderness to the dough)
- For the Royal Icing:
- 3 cups (360 g) powdered sugar, sifted
- 2 tablespoons meringue powder
- 5-6 tablespoons warm water (adjust for desired consistency)
- Food coloring gels (gel colors work best for vibrant shades)
- Optional: Edible glitter or sprinkles for decorating
Substitution tips: Use almond flour for a gluten-free twist (cookies will be softer). Swap whole milk with dairy-free options if needed — coconut or oat milk work well. For vegan versions, substitute butter with vegan margarine and use a flax egg instead of a chicken egg.
Equipment Needed
- Large mixing bowl and medium mixing bowl
- Electric hand mixer or stand mixer (helps cream the butter and sugar quickly)
- Measuring cups and spoons (accurate measurements matter here)
- Rolling pin (a textured or smooth one, depending on your preference)
- Cookie cutters (large round cutters or fun back-to-school shapes like apples or pencils)
- Baking sheets lined with parchment paper or silicone mats (non-stick surfaces are key)
- Wire cooling racks
- Spoons or piping bags for decorating icing (if you don’t have piping bags, use zip-top bags with a small corner snipped off)
For budget-friendly options, I’ve used wooden rolling pins and it works just fine. If you’re serious about decorating, investing in a few different piping tips can really open up creativity. Keep your mixing bowls and tools clean and dry for best results with royal icing.
Preparation Method
- Mix Dry Ingredients: In a medium bowl, whisk together 2 ¾ cups (345 g) flour, 1 teaspoon baking powder, and ½ teaspoon salt. Set aside. This step ensures even distribution of leavening agents, which helps the cookies rise just right. (5 minutes)
- Cream Butter and Sugar: In a large bowl, beat 1 cup (227 g) softened unsalted butter with 1 ½ cups (300 g) granulated sugar using an electric mixer on medium speed until light and fluffy — about 3-4 minutes. This step is crucial for the cookie’s tender texture. (4 minutes)
- Add Egg and Vanilla: Beat in 1 large egg and 1 teaspoon vanilla extract until combined. If your egg is cold, the batter might look a bit curdled — that’s okay, it will smooth out once the flour is added. (2 minutes)
- Combine Wet and Dry Ingredients: Slowly add the flour mixture to the butter mixture, alternating with 2 tablespoons of whole milk. Start and end with the flour. Mix on low speed until just combined — don’t overmix or the cookies will be tough. The dough should be soft but not sticky. (3 minutes)
- Chill the Dough: Divide the dough into two discs, wrap in plastic wrap, and refrigerate for at least 1 hour or up to overnight. Chilling makes the dough easier to roll and helps prevent spreading during baking. (1 hour minimum)
- Preheat Oven and Prepare Baking Sheets: Preheat your oven to 350°F (175°C). Line baking sheets with parchment paper or silicone baking mats. (10 minutes)
- Roll and Cut Cookies: On a floured surface, roll out dough to about ¼ inch (6 mm) thickness. Use large round cookie cutters (I like 4-5 inch diameter for that giant cookie effect) or back-to-school themed cutters. Transfer cookies gently to the baking sheets, leaving about 2 inches between each. (15 minutes)
- Bake: Bake cookies for 10-12 minutes, or until edges are just beginning to turn golden. The centers should look slightly underbaked — this keeps them soft inside. (12 minutes)
- Cool: Let cookies cool on the baking sheet for 5 minutes, then transfer to wire racks to cool completely before decorating. (20 minutes)
- Prepare Royal Icing: In a large bowl, whisk together 3 cups (360 g) sifted powdered sugar and 2 tablespoons meringue powder. Add 5 tablespoons warm water and beat until glossy and smooth. Adjust water to thin for flooding or thicken for piping. Divide and tint with gel food colors as desired. (10 minutes)
- Decorate Cookies: Use piping bags or spoons to outline and flood cookies with icing. Let each layer dry slightly before adding details or sprinkles. Dry completely at room temperature for several hours or overnight for best results. (30 minutes active, hours drying)
Pro tip: If the dough feels too soft while rolling, pop it back in the fridge for 10 minutes. Also, don’t skip chilling the dough — I learned that lesson the hard way when my cookies spread into sad little pancakes.
Cooking Tips & Techniques
Getting these giant decorated sugar cookies just right takes a few little tricks I’ve picked up over time. First, the key is in the butter temperature — too warm, and your dough will be sticky and hard to handle; too cold, and it won’t mix evenly. I like to leave my butter out for about an hour before starting.
When rolling out the dough, flour your surface lightly but avoid adding too much flour to the dough — you want the cookies to stay tender. Also, rolling to an even ¼ inch thickness helps cookies bake uniformly. I often use a rolling pin with thickness rings; it’s a simple tool that makes a big difference.
On the icing front, I learned that meringue powder is a game changer. It stabilizes the royal icing and helps it dry to a nice sheen without cracking. Don’t forget to sift your powdered sugar — lumps can ruin the smoothness.
One mistake I made a few times was rushing the icing drying time. Patience is key — if you decorate too soon, colors bleed and details get messy. I usually decorate the night before to let everything set properly.
For multitasking, prepare the dough the night before, chill it, and bake in the morning. While cookies cool, whip up the icing and start decorating once the cookies are completely cool. This approach keeps the process stress-free.
Variations & Adaptations
Want to switch things up? Here are some ideas you might enjoy:
- Flavor Boost: Add a teaspoon of almond extract or lemon zest to the dough for a fresh twist.
- Gluten-Free Version: Use a 1:1 gluten-free flour blend; expect a slightly softer texture but still delicious.
- Vegan Adaptation: Replace butter with vegan margarine and the egg with a flax egg (1 tablespoon flaxseed meal + 3 tablespoons water, let sit 5 minutes).
- Different Shapes: Try classic school shapes like apples, pencils, or chalkboards using cookie cutters for themed fun.
- Decorating Alternatives: Swap royal icing for a simple powdered sugar glaze if you want a quicker, less fussy finish.
I once made these cookies with fresh blueberries baked into the dough for a summer back-to-school party — a bit messy but surprisingly refreshing! Feel free to experiment to match your taste or occasion.
Serving & Storage Suggestions
These giant sugar cookies are best served at room temperature, letting the frosting’s sweetness balance with the soft cookie base. Present them on a colorful plate or wrap individually in clear cellophane tied with a ribbon for a charming first-day-of-school gift.
They pair beautifully with a glass of cold milk, hot cocoa, or even a fresh fruit smoothie for a wholesome snack or brunch addition.
To store, place cookies in an airtight container layered with parchment paper to prevent sticking. They keep well at room temperature for up to 3 days. For longer storage, freeze the undecorated baked cookies wrapped tightly in plastic wrap and foil for up to 3 months. Thaw completely before decorating.
If you’ve decorated ahead, keep them in a cool, dry place. Avoid refrigeration — it can cause the icing to sweat and lose its perfect finish. When reheating, a few seconds in the microwave can soften the cookie but avoid heating too long or the frosting will melt.
Over time, the flavors mellow and the cookies become even more tender, so you might want to make them a day ahead to enjoy that effect.
Nutritional Information & Benefits
Each giant sugar cookie (about 4-inch diameter) contains approximately 250-300 calories, with 10-12 grams of fat and 35-40 grams of carbohydrates. The recipe uses real butter and whole milk for authentic flavor and texture.
While these cookies are an indulgence, they offer a little mood boost — thanks to the sugar and vanilla’s comforting aroma, which can ease first-day jitters. Using quality ingredients means better taste and fewer additives compared to store-bought treats.
Potential allergens include gluten, dairy, and eggs, so adaptations are available for most dietary needs.
From a wellness perspective, I love that this recipe brings people together — whether it’s kids sharing cookies at school or families baking on a weekend. Sometimes, comfort food like this is exactly what the soul needs.
Conclusion
If you’re looking for a sweet way to mark the first day of school, these perfect giant decorated sugar cookies might just become your new tradition. They’re simple, fun, and bring a little extra joy to busy mornings.
Feel free to customize the shapes, colors, or flavors to fit your style — the recipe is forgiving and friendly for bakers of all levels. Honestly, I keep coming back to this one because it’s more than just a cookie; it’s a memory on a plate and a little confidence boost wrapped in frosting.
Give it a try, and let me know how your cookies turn out or what fun decorating ideas you discover. Sharing your experiences helps keep this recipe alive and growing in the sweetest way.
Happy baking and here’s to a beautifully delicious start to your school year!
FAQs
- Can I make these cookies ahead of time? Yes! You can bake the cookies up to 3 days ahead and store them in an airtight container. Decorate just before serving for the freshest look.
- What if I don’t have meringue powder for the royal icing? You can substitute with egg whites or use a simple powdered sugar glaze, though the texture will be different.
- How do I keep my cookies from spreading too much? Make sure the dough is well chilled before rolling and baking. Also, avoid using too much butter or overmixing the dough.
- Can I freeze the decorated cookies? It’s best to freeze undecorated baked cookies. Decorated cookies may crack or lose their finish when frozen.
- What’s the best way to get smooth icing on my cookies? Thin the royal icing to a flood consistency and use a piping bag to outline and then fill the cookie. Let it dry completely before adding details.
Pin This Recipe!
Perfect Giant Decorated Sugar Cookies Easy First Day of School Recipe

These giant decorated sugar cookies are a crowd-pleaser perfect for back-to-school celebrations, featuring a tender yet sturdy cookie base and smooth royal icing for decorating.
- Prep Time: 20 minutes
- Cook Time: 12 minutes
- Total Time: 1 hour 45 minutes
- Yield: 12 large cookies 1x
- Category: Dessert
- Cuisine: American
Ingredients
- 2 ¾ cups (345 g) all-purpose flour
- 1 teaspoon baking powder
- ½ teaspoon salt
- 1 cup (227 g) unsalted butter, softened
- 1 ½ cups (300 g) granulated sugar
- 1 large egg, room temperature
- 1 teaspoon pure vanilla extract
- 2 tablespoons whole milk
- 3 cups (360 g) powdered sugar, sifted
- 2 tablespoons meringue powder
- 5–6 tablespoons warm water
- Food coloring gels
- Optional: Edible glitter or sprinkles for decorating
Instructions
- In a medium bowl, whisk together flour, baking powder, and salt. Set aside.
- In a large bowl, beat softened butter with granulated sugar using an electric mixer on medium speed until light and fluffy, about 3-4 minutes.
- Beat in the egg and vanilla extract until combined.
- Slowly add the flour mixture to the butter mixture, alternating with whole milk, starting and ending with flour. Mix on low speed until just combined; do not overmix.
- Divide dough into two discs, wrap in plastic wrap, and refrigerate for at least 1 hour or up to overnight.
- Preheat oven to 350°F (175°C). Line baking sheets with parchment paper or silicone mats.
- Roll out dough on a floured surface to about ¼ inch thickness. Use large cookie cutters to cut shapes and transfer to baking sheets, leaving 2 inches between cookies.
- Bake for 10-12 minutes until edges begin to turn golden and centers look slightly underbaked.
- Cool cookies on baking sheet for 5 minutes, then transfer to wire racks to cool completely.
- Prepare royal icing by whisking powdered sugar and meringue powder in a large bowl. Add warm water and beat until smooth and glossy, adjusting water for desired consistency. Divide and tint with gel food colors.
- Decorate cookies using piping bags or spoons to outline and flood with icing. Let each layer dry slightly before adding details or sprinkles. Allow to dry completely at room temperature for several hours or overnight.
Notes
Chill dough for at least 1 hour to prevent spreading. Use meringue powder in royal icing for a smooth, shiny finish. Allow icing to dry completely before adding additional layers or details. For softer cookies, use almond flour for gluten-free version. Vegan adaptations include using vegan margarine and flax egg.
Nutrition
- Serving Size: 1 large cookie (abou
- Calories: 275
- Sugar: 25
- Sodium: 150
- Fat: 11
- Saturated Fat: 7
- Carbohydrates: 38
- Fiber: 0.5
- Protein: 3
Keywords: giant sugar cookies, decorated sugar cookies, back to school cookies, royal icing cookies, easy sugar cookies, first day of school recipe