Love this? Save it for later!
Share the inspiration with your friends
The night I met the red velvet firecracker cake pops recipe wasn’t unfolding like a typical baking adventure. I was at a local jazz club, nursing a surprisingly good cup of spiced hot chocolate, when the bartender—a quiet fellow who usually just slides drinks down the bar—started chatting about his weekend baking obsession. Honestly, I wasn’t expecting cooking advice from a guy who could name every saxophonist from the 1950s, but there I was, leaning over the counter, listening to him describe exactly how to make these vibrant red velvet firecracker cake pops with a luscious cream cheese filling.
He pulled out a tiny, slightly cracked notebook from behind the bar, the pages peppered with flour smudges and handwritten tweaks. It was clear this wasn’t just any recipe—it was a labor of love, perfected after many trial runs, some messes, and a fair share of kitchen fireworks (mostly from the oven overheating, he joked). The way he talked about the combination of the rich red velvet crumb and the tangy cream cheese filling—it sounded like a dessert that could make anyone grin with delight.
Maybe you’ve been there, caught off guard by a recipe shared in the most unexpected moment, and then couldn’t wait to try it yourself. That’s exactly what happened with this recipe, and it’s stuck with me ever since. It’s fun, a little bit festive (hence the “firecracker” name), and honestly, it’s a showstopper at any gathering. Let me tell you, this recipe isn’t just about dessert—it’s about those surprising little moments that brighten your day and fill your kitchen with warmth and laughter.
Why You’ll Love This Recipe
After baking these red velvet firecracker cake pops multiple times, I can confidently say this recipe ticks all the boxes for a crowd-pleasing treat. Tested in my own kitchen with friends and family, it’s a sweet that’s not just about looks but packs an unforgettable flavor punch.
- Quick & Easy: Ready in under an hour, making it perfect for those last-minute party plans or spontaneous sweet cravings.
- Simple Ingredients: You probably have everything in your pantry already—no need for exotic or expensive items.
- Perfect for Celebrations: Whether it’s a birthday bash, a casual get-together, or just a cozy night in, these cake pops bring fun and flair.
- Crowd-Pleaser: Kids and adults alike rave about the moist cake and creamy filling combo—trust me, they disappear fast.
- Unbelievably Delicious: The balance of the tender red velvet cake with the tangy cream cheese filling is pure magic.
- What sets this recipe apart? The cream cheese filling isn’t just spread on—it’s nestled inside each pop, giving a surprise burst of flavor that’s perfectly creamy without being overpowering.
- Plus, the subtle hint of vanilla and just the right amount of cocoa create a cake texture that’s moist but firm enough to hold together beautifully on the stick.
This dessert isn’t just another cake pop recipe; it’s the kind that makes you pause, savor, and maybe even close your eyes after the first bite. Honestly, it’s the kind of treat that turns a simple moment into a celebration.
What Ingredients You Will Need
This recipe uses straightforward, wholesome ingredients to create a cake pop that’s bursting with flavor and texture. Most of these are pantry staples, and if you’re like me, you’ll appreciate how easy it is to swap a few things for dietary preferences or what’s on hand.
- For the Red Velvet Cake:
- All-purpose flour – 1 ½ cups (180 g)
- Cocoa powder (unsweetened) – 2 tbsp (15 g)
- Baking soda – 1 tsp
- Salt – ½ tsp
- Granulated sugar – 1 cup (200 g)
- Vegetable oil – ½ cup (120 ml) (adds moistness)
- Large eggs – 2, room temperature
- Buttermilk – 1 cup (240 ml) (or milk + 1 tbsp vinegar as a substitute)
- Red food coloring – 2 tbsp (adjust for desired vibrancy)
- Vanilla extract – 1 tsp (high-quality vanilla makes a difference)
- White vinegar – 1 tsp (helps with the classic red velvet tang)
- For the Cream Cheese Filling:
- Cream cheese – 8 oz (225 g), softened (I prefer Philadelphia for smoothness)
- Unsalted butter – 4 tbsp (60 g), softened
- Powdered sugar – 1 cup (120 g), sifted for smoothness
- Vanilla extract – 1 tsp
- For Assembling:
- White chocolate or candy melts – 12 oz (340 g) for coating
- Sprinkles or edible glitter – optional, for that firecracker pop look
- Wooden lollipop sticks – about 20
If you want a gluten-free option, almond flour or a gluten-free all-purpose blend can work well here, though the texture will be a bit denser. For a dairy-free twist, swap cream cheese and butter with plant-based alternatives and use dairy-free milk for the buttermilk substitute.
Equipment Needed
- Mixing bowls – at least two for cake and filling
- Electric mixer or stand mixer – makes cream cheese filling smooth and cake batter easy to blend
- Measuring cups and spoons – for accuracy
- Baking pan – 8×8 inch (20×20 cm) square pan works perfectly for this cake
- Lollipop sticks – wooden, food-safe
- Microwave-safe bowl or double boiler – for melting chocolate or candy melts
- Baking parchment or silicone mat – to place cake pops for setting
- Cooling rack – helpful for cake cooling
If you don’t have a stand mixer, a good handheld electric mixer works just fine. For melting chocolate, a microwave with short bursts and stirring in between prevents burning. I once melted mine too fast and ended up with grainy chocolate—lesson learned!
Preparation Method
- Preheat and prepare baking pan: Preheat your oven to 350°F (175°C). Grease an 8×8 inch (20×20 cm) square baking pan and line it with parchment paper for easy removal. This step saves you from a cake stuck like glue later.
- Mix dry ingredients: In a medium bowl, sift together 1 ½ cups (180 g) all-purpose flour, 2 tbsp (15 g) cocoa powder, 1 tsp baking soda, and ½ tsp salt. Set aside.
- Combine wet ingredients: In a large bowl, whisk 1 cup (200 g) granulated sugar with ½ cup (120 ml) vegetable oil until combined. Add 2 large eggs one at a time, whisking well after each. Stir in 1 cup (240 ml) buttermilk, 2 tbsp red food coloring, 1 tsp vanilla extract, and 1 tsp white vinegar. The batter will look bright and inviting.
- Incorporate dry into wet: Gradually add the dry ingredients to the wet mixture, folding gently with a spatula until smooth. Avoid overmixing—you want a tender crumb, not a dense cake.
- Bake the cake: Pour the batter into the prepared pan and bake for 30-35 minutes, or until a toothpick inserted comes out clean. The cake should spring back when lightly pressed. Let it cool completely on a wire rack—this can take about an hour, so plan ahead.
- Prepare the cream cheese filling: While the cake cools, beat 8 oz (225 g) softened cream cheese with 4 tbsp (60 g) softened unsalted butter until creamy. Gradually add 1 cup (120 g) powdered sugar and 1 tsp vanilla extract. Beat until smooth and fluffy. Refrigerate if the mixture feels too soft for filling.
- Break down the cake: Once cooled, crumble the cake into fine crumbs in a large bowl. It’s easiest to do this by hand—try not to eat too much of the crumbs, though I can’t promise I didn’t sneak a few!
- Mix crumbs with filling: Add about half of the cream cheese filling to the cake crumbs and mix gently until combined but still crumbly enough to shape. Add more filling if needed—you want a dough-like consistency that holds when pressed.
- Shape cake pops: Using your hands or a small cookie scoop, form the mixture into 1 ½-inch (4 cm) balls. Place them on a parchment-lined tray. Chill in the fridge for about 30 minutes to firm up.
- Insert sticks and coat: Melt white chocolate or candy melts in short bursts in the microwave or using a double boiler until smooth. Dip the tip of each lollipop stick into melted chocolate, then insert halfway into each cake ball (this acts like glue). Dip each cake pop fully into the melted chocolate, letting excess drip off.
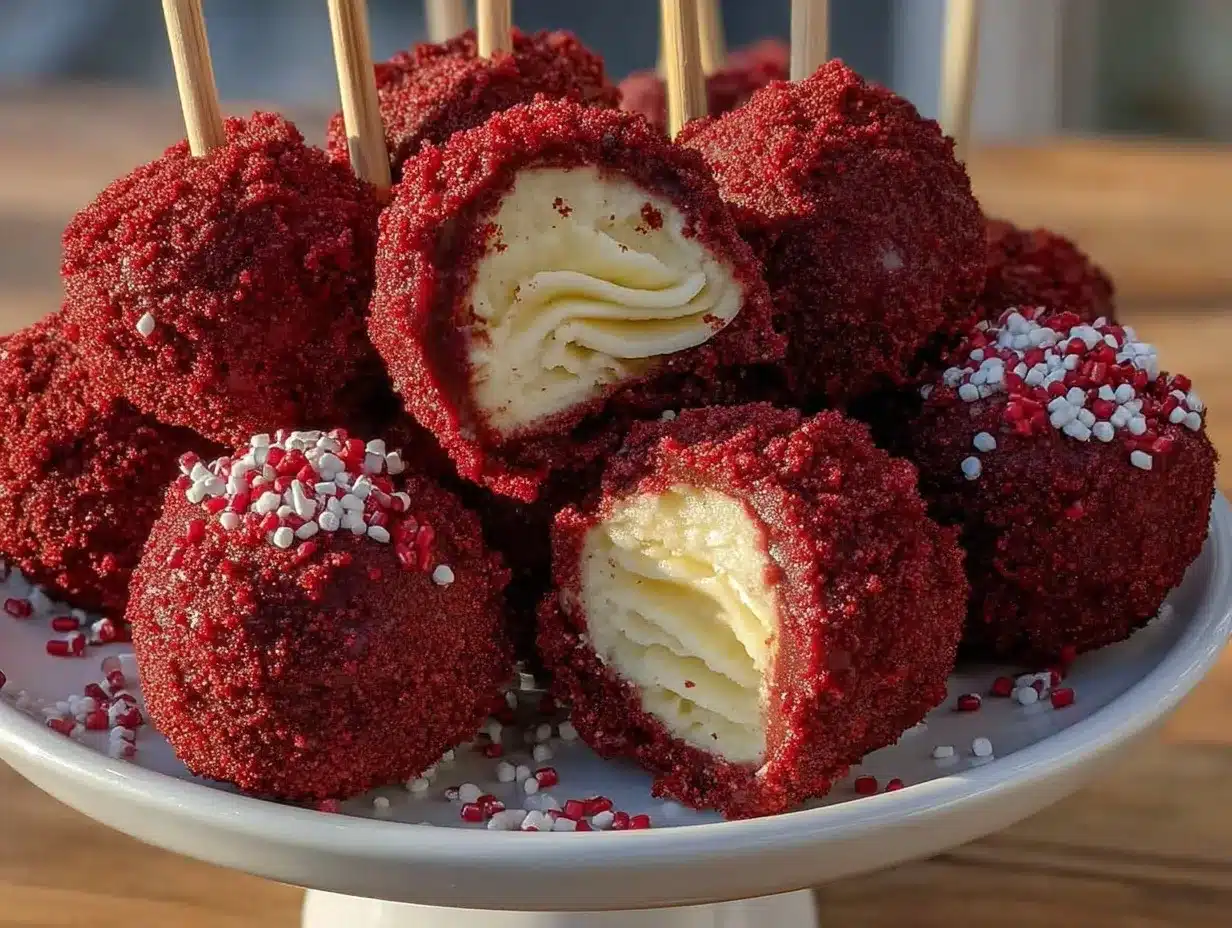
- Decorate and set: Before the coating sets, sprinkle with your choice of colorful sprinkles or edible glitter for that “firecracker” effect. Place the pops upright in a styrofoam block or glass to dry completely, about 15-20 minutes.
Pro tip: If your coating is too thick, stir in a teaspoon of vegetable oil to thin it without losing shine. Also, keep the cake pops refrigerated if not serving immediately to maintain firmness.
Cooking Tips & Techniques
Making red velvet firecracker cake pops is as much about technique as it is about ingredients. Here are some tips I picked up along the way:
- The key to moist cake pops is not to overbake the cake. Keep a close eye starting at 30 minutes so it doesn’t dry out.
- When mixing crumbs with filling, add the cream cheese filling slowly. It’s easy to make the mixture too wet, which makes shaping tricky.
- Chilling the cake balls is essential—it helps them hold their shape when dipped in chocolate. I’ve learned the hard way that skipping this step leads to sad, droopy pops.
- Use a high-quality white chocolate or candy melts for coating. Cheaper chocolates can clump or not set well.
- When dipping, tap the stick gently on the bowl edge to remove excess coating—otherwise, you get uneven lumps.
- Plan your timing: while cake is cooling, prepare the filling. While filling chills, crumble cake. This multitasking saves time and keeps everything moving smoothly.
Variations & Adaptations
Want to switch things up? These red velvet firecracker cake pops are versatile and can be adapted to suit your taste or dietary needs.
- Flavor variation: Add a teaspoon of espresso powder to the cake batter for a mocha twist that pairs beautifully with cream cheese.
- Seasonal adaptation: For a festive holiday version, swap sprinkles for crushed peppermint candies or edible gold dust.
- Dietary swaps: Use gluten-free flour blend to make these gluten-free. For dairy-free, substitute cream cheese and butter with coconut-based alternatives and use almond or oat milk for buttermilk.
- Cooking method: If you want to avoid baking, try a no-bake red velvet cake base by using store-bought red velvet cake crumbs or even red velvet cookies crushed finely.
- Personally, I once made a batch with a cream cheese and mascarpone mix for extra richness—totally decadent and worth trying if you want a creamier filling.
Serving & Storage Suggestions
These cake pops are best served chilled or at room temperature. The cool cream cheese filling contrasts nicely with the slightly firmer coating. Present them in a colorful holder or glass jar for a fun display that instantly brightens up any dessert table.
Pair these pops with a cup of strong black coffee or a creamy hot chocolate for a cozy treat. They also go surprisingly well with a glass of cold milk for kids’ parties.
To store, keep the cake pops in an airtight container in the refrigerator for up to 4 days. For longer storage, freeze them individually wrapped in plastic wrap, then place in a freezer-safe container for up to a month.
Reheat gently by letting them thaw in the fridge overnight before serving. Flavors develop nicely after a day or two in the fridge, so making them ahead is a smart move.
Nutritional Information & Benefits
Each red velvet firecracker cake pop contains approximately 180-220 calories, depending on size and coating. The cream cheese filling adds protein and a creamy texture, while the cake offers some carbohydrates for energy.
Key ingredients like cocoa powder bring antioxidants, and the moderate use of sugar keeps these treats indulgent but not overwhelming. For those watching allergens, these pops contain dairy, eggs, and gluten unless substitutions are made.
From my wellness perspective, these cake pops are a delightful occasional treat—perfect when you want to share joy without overdoing it.
Conclusion
This red velvet firecracker cake pops recipe has become one of my go-to desserts when I want to impress without spending hours in the kitchen. It’s approachable, fun, and always delivers that wow factor with its creamy center and vibrant exterior.
Feel free to tweak the filling richness, decoration, or even cake texture to suit your taste. I love hearing how readers make this recipe their own. Honestly, it’s the little personal touches that make baking so rewarding.
Why not bring a bit of unexpected joy to your next gathering with these pops? And when you do, I’d love to hear how it went—share your thoughts, tips, or photos! Remember, cooking is about sharing moments, and these pops are a delicious way to do just that.
FAQs
- Can I make these cake pops ahead of time?
Yes! They keep well refrigerated for up to 4 days or frozen for about a month. - What if I don’t have buttermilk?
You can make a quick substitute by adding 1 tbsp vinegar or lemon juice to 1 cup milk and letting it sit for 5 minutes. - How do I prevent the cake pops from falling off the sticks?
Dip the stick tip in melted chocolate before inserting into the cake ball; this acts like glue and helps secure them. - Can I use a different coating than white chocolate?
Absolutely! Candy melts or colored chocolate coatings work well and add variety. - Are these cake pops suitable for kids?
Yes, they’re a fun and safe treat for kids, just watch the size and sugar intake.
Pin This Recipe!
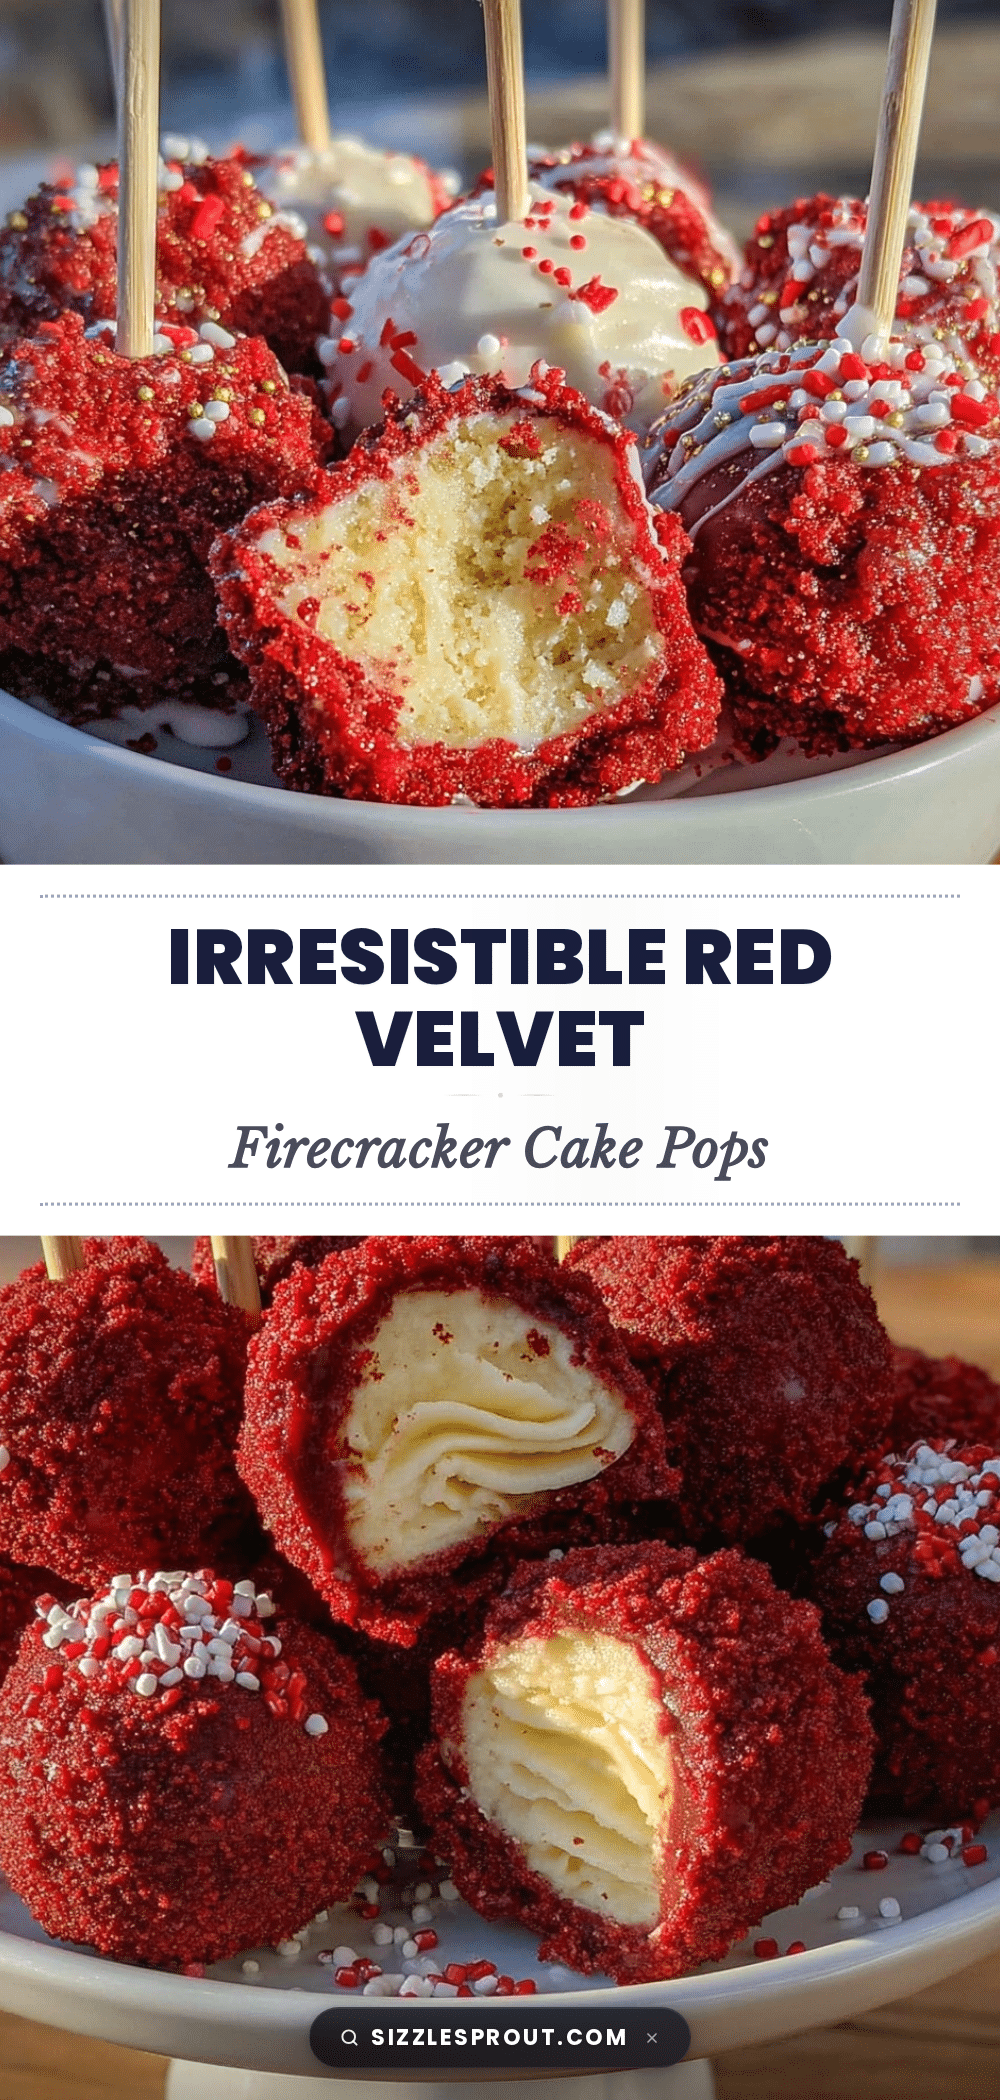
Delicious Red Velvet Firecracker Cake Pops
These vibrant red velvet firecracker cake pops feature a moist red velvet cake with a luscious cream cheese filling, perfect for celebrations and crowd-pleasing treats.
- Prep Time: 20 minutes
- Cook Time: 35 minutes
- Total Time: 1 hour 30 minutes
- Yield: 20 cake pops
- Category: Dessert
- Cuisine: American
Ingredients
- All-purpose flour – 1 ½ cups (180 g)
- Cocoa powder (unsweetened) – 2 tbsp (15 g)
- Baking soda – 1 tsp
- Salt – ½ tsp
- Granulated sugar – 1 cup (200 g)
- Vegetable oil – ½ cup (120 ml)
- Large eggs – 2, room temperature
- Buttermilk – 1 cup (240 ml) (or milk + 1 tbsp vinegar as a substitute)
- Red food coloring – 2 tbsp
- Vanilla extract – 1 tsp
- White vinegar – 1 tsp
- Cream cheese – 8 oz (225 g), softened
- Unsalted butter – 4 tbsp (60 g), softened
- Powdered sugar – 1 cup (120 g), sifted
- Vanilla extract – 1 tsp
- White chocolate or candy melts – 12 oz (340 g) for coating
- Sprinkles or edible glitter – optional
- Wooden lollipop sticks – about 20
Instructions
- Preheat your oven to 350°F (175°C). Grease an 8×8 inch (20×20 cm) square baking pan and line it with parchment paper.
- In a medium bowl, sift together 1 ½ cups all-purpose flour, 2 tbsp cocoa powder, 1 tsp baking soda, and ½ tsp salt. Set aside.
- In a large bowl, whisk 1 cup granulated sugar with ½ cup vegetable oil until combined. Add 2 large eggs one at a time, whisking well after each.
- Stir in 1 cup buttermilk, 2 tbsp red food coloring, 1 tsp vanilla extract, and 1 tsp white vinegar.
- Gradually add the dry ingredients to the wet mixture, folding gently with a spatula until smooth. Avoid overmixing.
- Pour the batter into the prepared pan and bake for 30-35 minutes, or until a toothpick inserted comes out clean. Let cool completely on a wire rack.
- While the cake cools, beat 8 oz softened cream cheese with 4 tbsp softened unsalted butter until creamy. Gradually add 1 cup powdered sugar and 1 tsp vanilla extract. Beat until smooth and fluffy. Refrigerate if too soft.
- Once cooled, crumble the cake into fine crumbs in a large bowl.
- Add about half of the cream cheese filling to the cake crumbs and mix gently until combined but still crumbly enough to shape. Add more filling if needed.
- Form the mixture into 1 ½-inch balls. Place on a parchment-lined tray and chill in the fridge for about 30 minutes.
- Melt white chocolate or candy melts until smooth. Dip the tip of each lollipop stick into melted chocolate, then insert halfway into each cake ball.
- Dip each cake pop fully into the melted chocolate, letting excess drip off.
- Before coating sets, sprinkle with sprinkles or edible glitter. Place pops upright to dry completely, about 15-20 minutes.
- Refrigerate if not serving immediately to maintain firmness.
Notes
Do not overbake the cake to keep it moist. Add cream cheese filling slowly to avoid a mixture too wet to shape. Chill cake balls before dipping to maintain shape. Use high-quality white chocolate or candy melts for best coating results. Stir in a teaspoon of vegetable oil if coating is too thick. Store refrigerated up to 4 days or freeze up to 1 month.
Nutrition
- Serving Size: 1 cake pop
- Calories: 200
- Sugar: 16
- Sodium: 150
- Fat: 12
- Saturated Fat: 6
- Carbohydrates: 22
- Fiber: 1
- Protein: 3
Keywords: red velvet cake pops, cream cheese filling, cake pops recipe, party dessert, easy cake pops, firecracker cake pops