Love this? Save it for later!
Share the inspiration with your friends
“Are we really doing sandwiches again?” my son groaned last Thursday afternoon, eyeing the lunchbox like it was a foreign object. Honestly, I get it—summer lunch can feel like a never-ending loop of the same old options. One day, I was juggling grocery bags and torn between the scorching heat and hunger-induced meltdowns when I stumbled upon the perfect solution: an easy kid-approved no-cook summer lunch rotation. It wasn’t planned, just a spontaneous scramble to avoid turning on the oven or stove, and it totally changed our midday routine.
Let me tell you, the best part is that these lunches don’t just save time—they keep the kids happy and full without the usual battle over “what’s for lunch.” I mean, you know that feeling when the clock’s ticking, the kids are starving, and the last thing you want is a kitchen marathon? This rotation became my go-to lifesaver that week and has stuck around like an old friend. Plus, no oven means no extra heat in the house—a win-win in my book.
Maybe you’ve been there yourself, scrambling to find meals that are quick, healthy, and actually appealing to picky eaters. This rotation isn’t some complicated gourmet list; it’s simple, no-fuss, and based on real-world trial and error (including a few messy mix-ups and forgotten ingredients along the way). So, whether you’re a busy parent, a caregiver, or just someone who hates heating up the kitchen in summer, this easy kid-approved no-cook summer lunch rotation is for you—and your lunch hour sanity.
Why You’ll Love This Recipe
After testing countless lunches on my own crew, I can honestly say this easy kid-approved no-cook summer lunch rotation ticks all the boxes. It’s designed with busy families in mind, so you get meals that are fast, fuss-free, and totally satisfying.
- Quick & Easy: Each lunch comes together in under 10 minutes, perfect for those hectic mornings or last-minute meal planning.
- Simple Ingredients: No need for specialty shopping trips; everything is pantry or fridge staples you likely already have.
- Perfect for Summer: No heat in the kitchen, no boiling water, just fresh, light, and cool meals that kids love.
- Crowd-Pleaser: My little ones give these lunches two thumbs up, and I’ve had neighbors ask for recipes after catching a whiff of the fruit and cheese combos!
- Unbelievably Delicious: The balance of fresh veggies, fruits, protein, and whole grains makes these lunches feel anything but boring.
What sets this rotation apart? It’s more than just no-cook convenience. I’ve fine-tuned the flavor combos so they’re not only nutritious but genuinely enjoyable for young taste buds. For example, swapping plain yogurt for a honey-swirled Greek version adds a touch of sweetness without overdoing sugar. Plus, the variety in textures—from creamy hummus to crunchy veggies—keeps things interesting. This isn’t your usual sandwich-and-chips lineup; it’s a practical, tested rotation that turns simple ingredients into kid-friendly meals that make summer lunch something to look forward to.
What Ingredients You Will Need
This easy kid-approved no-cook summer lunch rotation relies on fresh, wholesome ingredients that keep prep time minimal and flavor maximal. Most are pantry staples or everyday fresh finds, making substitutions straightforward if needed.
- For the Protein:
- Hummus (store-bought or homemade, I love Sabra for smooth texture)
- Pre-cooked rotisserie chicken, shredded (great for quick protein boost)
- Hard-boiled eggs, peeled and ready
- Cheese slices or cubes (mild cheddar or mozzarella work well)
- Greek yogurt (plain or honey-flavored; swap dairy-free coconut yogurt if needed)
- For the Grains & Carbs:
- Whole wheat pita bread or wraps (look for soft, pliable brands like Joseph’s)
- Whole grain crackers or rice cakes
- Pre-cooked quinoa or couscous (optional, for salads or bowls)
- For the Veggies & Fruits:
- Cherry tomatoes, halved
- Cucumber slices
- Carrot sticks or baby carrots
- Bell pepper strips (red, yellow, or orange for sweetness)
- Fresh berries (strawberries, blueberries, or raspberries)
- Apple slices (toss with lemon juice to prevent browning)
- Grapes, halved for safety
- Extras & Flavor Boosters:
- Nut butters (almond or peanut, unsweetened)
- Honey or maple syrup (for a touch of natural sweetness)
- Olive oil (extra virgin, for drizzling)
- Lemon juice (freshly squeezed)
- Mixed seeds or nuts (sunflower seeds, pumpkin seeds, chopped walnuts)
- Fresh herbs like parsley or basil (optional but adds freshness)
Feel free to swap ingredients based on your pantry or dietary needs. For instance, gluten-free wraps or crackers work just as well, and swapping Greek yogurt for a plant-based alternative keeps things dairy-free. This rotation is designed to be flexible and forgiving.
Equipment Needed
One of the best things about this easy kid-approved no-cook summer lunch rotation is how little equipment you need. Here’s what helped me keep things smooth and quick:
- Cutting board and sharp knife: For slicing fruits and veggies quickly and safely.
- Mixing bowls: Useful for tossing salads or mixing spreads like hummus with herbs.
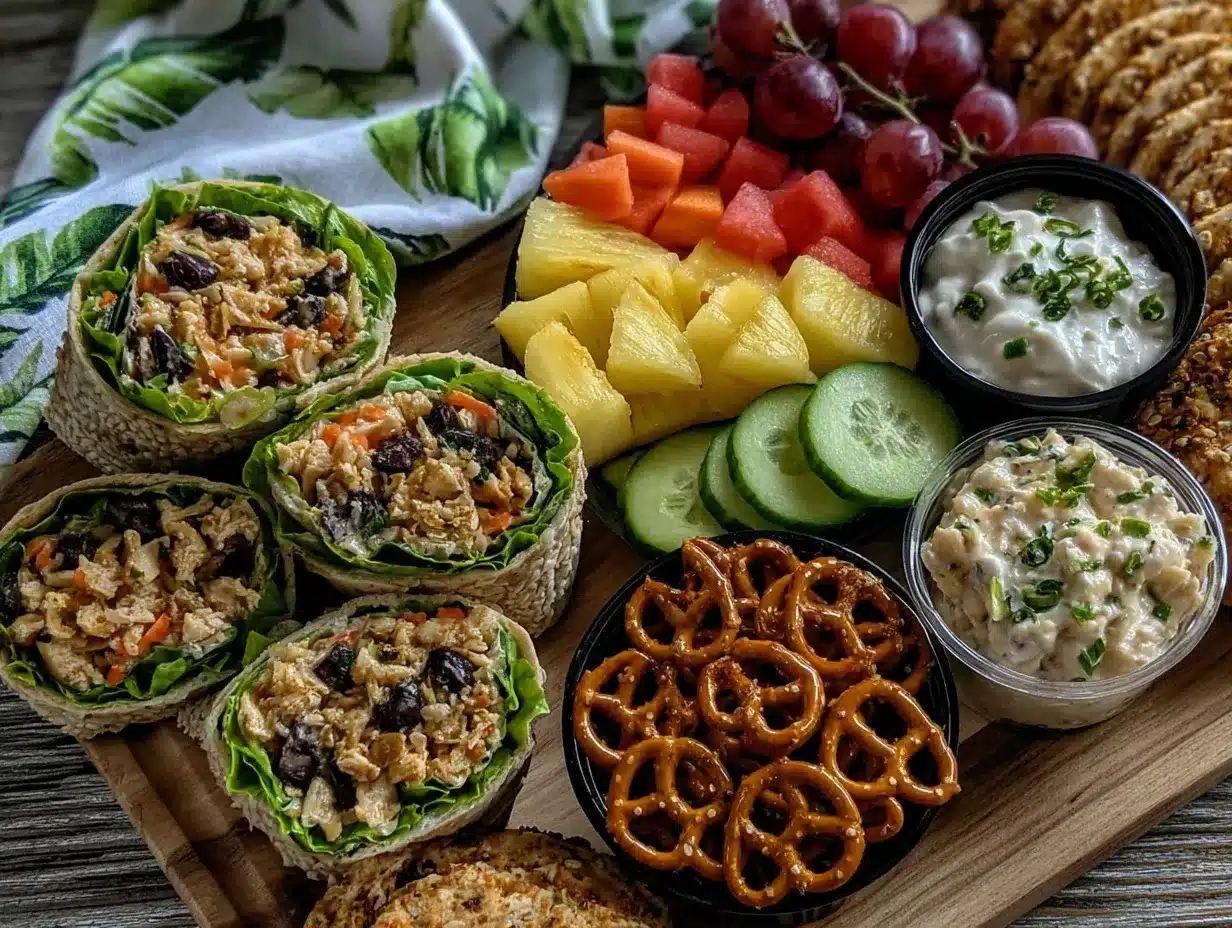
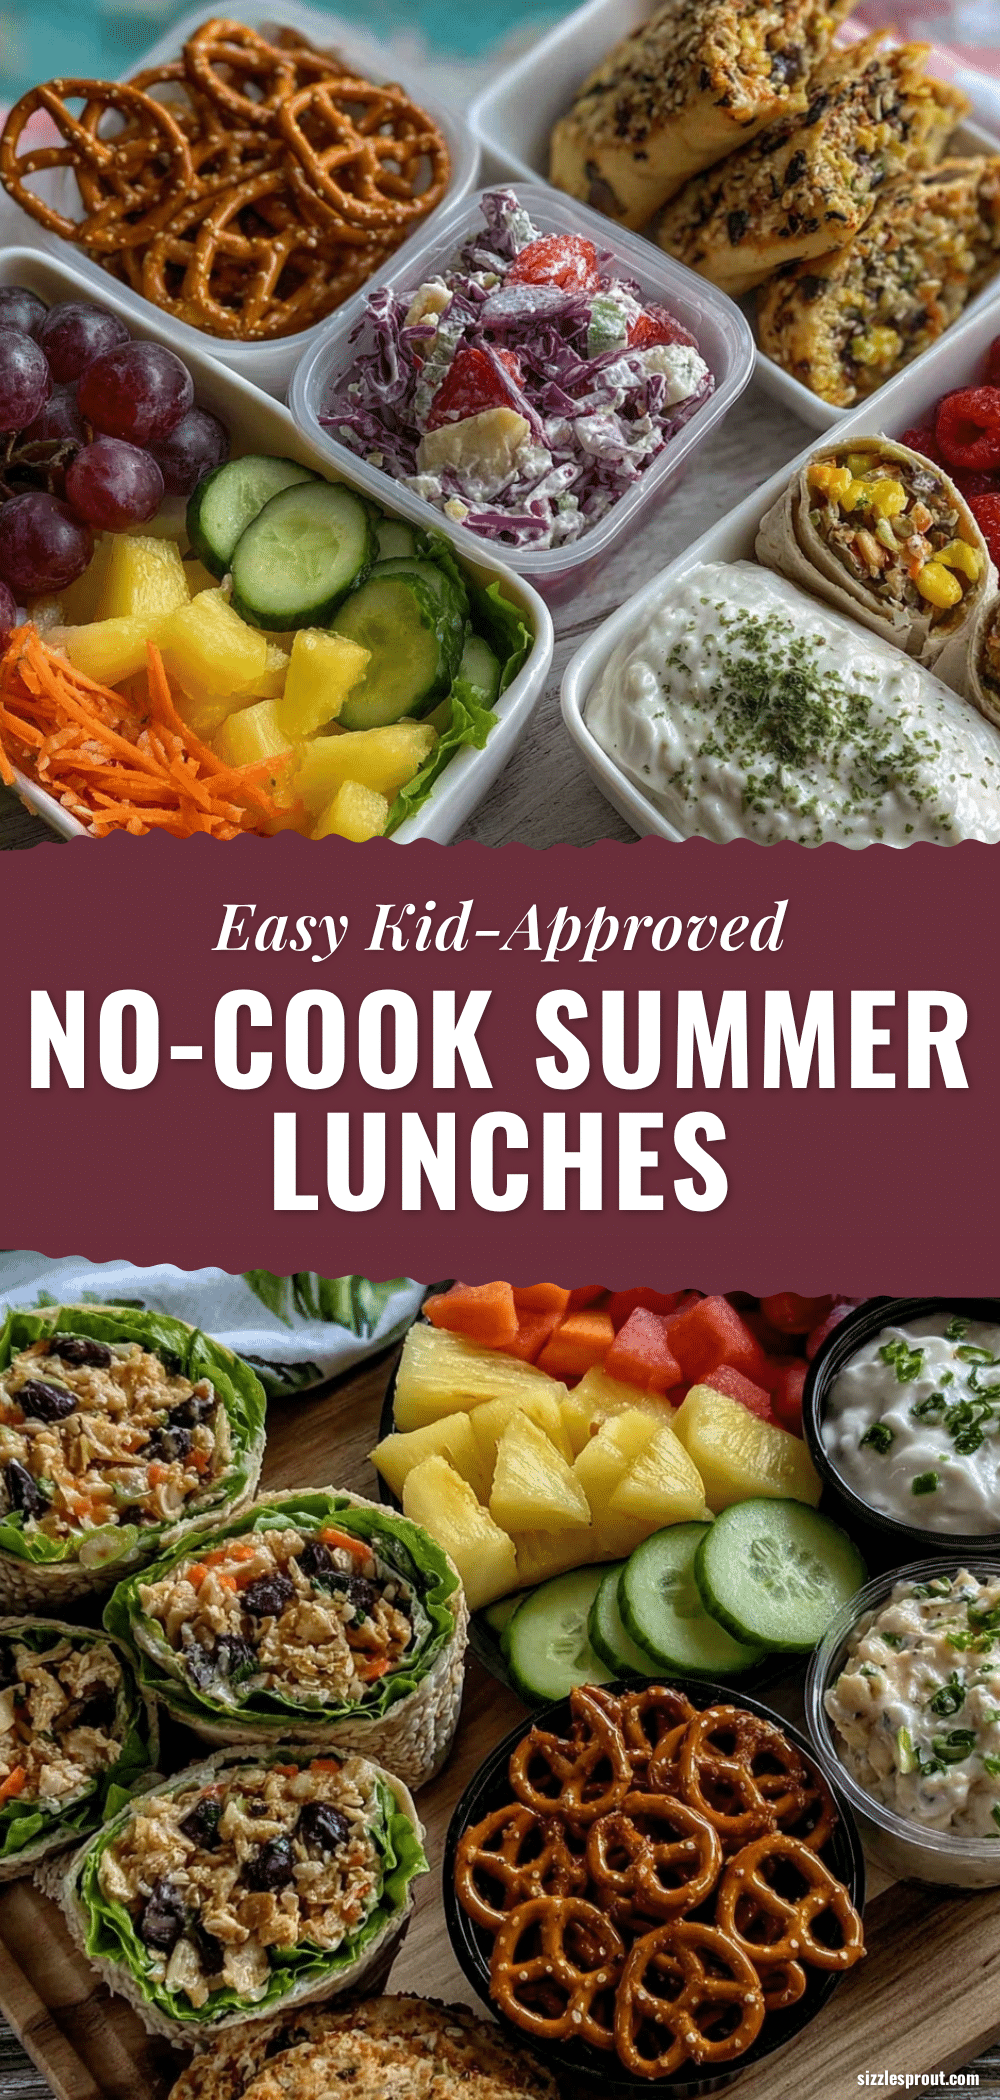
- Lunch containers or bento boxes: Compartments help keep different foods separate and visually appealing—kids love that!
- Measuring spoons: Handy for portioning dressings or spreads, but eyeballing works fine too.
- Spreading knife or small spoon: For smooth hummus or nut butter application.
If you don’t have a bento box, no worries—small reusable containers or even silicone muffin cups inside a regular lunchbox do the trick. I personally prefer a good sharp knife for quick slicing, and a set of colorful containers that stack easily in the fridge. Keeping your tools clean and sharp really speeds up prep and keeps things safe.
Preparation Method
- Gather and prep all ingredients: Wash and dry fruits and vegetables thoroughly (about 10 minutes). Slice cherry tomatoes in half, cut cucumber and bell peppers into sticks, and prepare carrot sticks if not pre-cut.
- Prepare proteins: If using pre-cooked chicken, shred or cut into bite-sized pieces. Hard-boil eggs ahead of time or use store-bought. Portion out cheese cubes or slices. Spoon out hummus and yogurt into small bowls or containers (5 minutes).
- Assemble grain components: Warm pita bread slightly if desired (optional), then cut into triangles. Portion crackers or rice cakes into snack-sized servings (2-3 minutes).
- Mix any dressings or flavor boosters: Combine olive oil, lemon juice, and a pinch of salt in a small bowl for a light drizzle over veggies. Mix a bit of honey into Greek yogurt for added sweetness, if preferred (2 minutes).
- Build the lunch containers: Start by placing the protein items in one section, followed by grains, then colorful veggies and fruits in separate compartments. Add a small container or section for dips like hummus or yogurt. Sprinkle seeds or nuts on top of veggies or yogurt for texture (5 minutes).
- Final touch and packing: Cover containers tightly and store in the fridge until ready to go. Include an ice pack to keep everything fresh during transport (1-2 minutes).
Pro tip: If you’re prepping multiple lunches, assemble in batches to save time. The hardest part is remembering to buy enough hummus before the week starts (I learned that the hard way when I had to improvise with extra nut butter). Keep an eye on freshness—some fruits like apples and avocados might brown if sliced too early. I like to prep those the morning of or toss with a little lemon juice to keep them bright.
Cooking Tips & Techniques
Even though this rotation skips cooking, a few tips can make your no-cook lunches taste like a little masterpiece every time.
- Keep textures interesting: Kids tend to notice if everything feels mushy or soft. Pair crunchy veggies with creamy dips or soft cheese for contrast.
- Prep in advance: Hard-boil eggs and shred chicken early in the week. It cuts down on daily stress and means you’re not scrambling at the last minute.
- Watch portion sizes: Small, bite-sized pieces are easier and safer for kids, especially younger ones.
- Rotate flavors: Try swapping plain hummus for roasted red pepper or garlic varieties to keep taste buds curious.
- Keep it colorful: Bright reds, greens, yellows, and purples make lunch visually appealing and more inviting to eat.
- Don’t forget hydration: Include a small bottle of water or a fun herbal iced tea to keep your kiddo refreshed—summer heat can sneak up fast.
One mistake I made early on was packing wet veggies right next to crackers, which resulted in soggy snacks. Learning to compartmentalize with separate containers or silicone cups saved the day. Also, sometimes my kids would want to dip everything (including fruit) into hummus—gross or genius? You decide! It’s all about making lunchtime fun and flexible.
Variations & Adaptations
This easy kid-approved no-cook summer lunch rotation is pretty flexible, which means you can tailor it to your family’s tastes and needs.
- Gluten-Free Option: Swap pita and crackers for gluten-free wraps or seed crackers. Quinoa salad makes a great grain base without gluten.
- Vegetarian Version: Load up on hummus, cheese, hard-boiled eggs, and plenty of fresh veggies. Add beans or lentil salad for extra protein.
- Seasonal Swaps: In cooler months, swap fresh berries for sliced pears or oranges. Add roasted nuts instead of seeds for crunch.
- Flavor Twists: Mix a little cinnamon into nut butter for a sweet spin, or add diced avocado to wraps for creaminess.
- Personal Favorite: My kids love when I add a small container of cottage cheese with a drizzle of honey and blueberries—a quick, no-cook treat that feels special.
Feel free to mix and match these ideas. The goal is to keep lunch interesting and easy, not complicated or stressful. Remember, even the pickiest eaters can find something they like in this rotation!
Serving & Storage Suggestions
Serving these no-cook lunches chilled or at room temperature is best, especially in summer heat. I usually pack everything up the night before and keep it in the fridge until morning to keep things fresh.
Pair these lunches with a cold beverage like water infused with cucumber slices or a splash of lemon for a refreshing twist. If you’re looking for sides, simple additions like fruit salad or crunchy veggie sticks work great.
For storage, use airtight containers to maintain freshness. Most components will keep well in the fridge for 1-2 days. If you prep hard-boiled eggs or chicken in advance, store separately and combine at lunchtime to avoid sogginess.
Reheating isn’t necessary since these are no-cook lunches, but if you want to warm pita bread slightly, a quick 10-second zap in the microwave does the trick without drying it out. Over time, flavors tend to meld nicely, especially in dips and salads, so prepping a day ahead can actually improve taste.
Nutritional Information & Benefits
This easy kid-approved no-cook summer lunch rotation is packed with balanced nutrition to fuel growing bodies. Each meal offers a good mix of protein, fiber, vitamins, and healthy fats.
- Protein: Provided by hummus, cheese, eggs, and chicken, supporting muscle growth and energy.
- Fiber: Fresh fruits, veggies, and whole grains aid digestion and keep kids feeling full.
- Healthy Fats: Nuts, seeds, and olive oil promote brain health and satiety.
- Vitamins & Minerals: Colorful produce offers vitamins A, C, and K, plus essential minerals like potassium.
This rotation can easily accommodate dietary preferences like gluten-free or vegetarian while maintaining wholesome benefits. It’s also naturally low in added sugars and processed ingredients, making it a smart choice for everyday summer meals. Personally, I feel great knowing I’m handing my kids food that’s both tasty and nourishing without a ton of fuss.
Conclusion
If you’re looking for an easy, kid-approved no-cook summer lunch rotation that actually works, this is it. It removes the stress of last-minute meal prep, keeps the kitchen cool, and most importantly, keeps kids happily eating. The beauty is in its simplicity and flexibility—you can tweak ingredients to match your pantry and your family’s tastes.
I love this rotation because it turned lunchtime from a daily headache into a routine I look forward to. Plus, the smiles when my kids see their lunches ready and colorful? Priceless. Give it a try, and let me know how it goes for you. Maybe you’ll even find a new favorite combo or two to add to your summer lunch lineup!
Don’t forget to share your twists or questions in the comments—I’m always excited to hear how others make these ideas their own.
FAQs
- Q: Can these lunches be made the night before?
A: Absolutely! Most components keep well overnight in the fridge. Just pack fruits that brown, like apples, separately or toss with lemon juice to keep fresh. - Q: What if my kids don’t like vegetables?
A: Try offering crunchy veggies with a tasty dip like hummus or a mild yogurt sauce. Sometimes presentation and fun shapes help, too! - Q: How do I keep the lunches safe in warm weather?
A: Use insulated lunch bags with ice packs to keep food chilled until lunchtime. - Q: Are there dairy-free options?
A: Yes! Swap cheese and yogurt for dairy-free alternatives like almond-based cheese and coconut yogurt. - Q: Can I add homemade dips?
A: Definitely! Homemade hummus, guacamole, or yogurt-based dips work perfectly and add fresh flavors.
Pin This Recipe!
Easy Kid-Approved No-Cook Summer Lunch Rotation for Quick Healthy Meals
A simple, no-cook lunch rotation designed for busy families that is quick, healthy, and kid-approved. Perfect for summer with fresh ingredients and minimal prep.
- Prep Time: 10 minutes
- Cook Time: 0 minutes
- Total Time: 20-25 minutes
- Yield: 4 servings
- Category: Main Course
- Cuisine: American
Ingredients
- Hummus (store-bought or homemade)
- Pre-cooked rotisserie chicken, shredded
- Hard-boiled eggs, peeled and ready
- Cheese slices or cubes (mild cheddar or mozzarella)
- Greek yogurt (plain or honey-flavored; dairy-free coconut yogurt as alternative)
- Whole wheat pita bread or wraps
- Whole grain crackers or rice cakes
- Pre-cooked quinoa or couscous (optional)
- Cherry tomatoes, halved
- Cucumber slices
- Carrot sticks or baby carrots
- Bell pepper strips (red, yellow, or orange)
- Fresh berries (strawberries, blueberries, or raspberries)
- Apple slices (tossed with lemon juice)
- Grapes, halved
- Nut butters (almond or peanut, unsweetened)
- Honey or maple syrup
- Olive oil (extra virgin)
- Lemon juice (freshly squeezed)
- Mixed seeds or nuts (sunflower seeds, pumpkin seeds, chopped walnuts)
- Fresh herbs like parsley or basil (optional)
Instructions
- Gather and prep all ingredients: wash and dry fruits and vegetables thoroughly (about 10 minutes). Slice cherry tomatoes in half, cut cucumber and bell peppers into sticks, and prepare carrot sticks if not pre-cut.
- Prepare proteins: shred or cut pre-cooked chicken into bite-sized pieces. Use hard-boiled eggs peeled and ready. Portion out cheese cubes or slices. Spoon out hummus and yogurt into small bowls or containers (5 minutes).
- Assemble grain components: optionally warm pita bread slightly, then cut into triangles. Portion crackers or rice cakes into snack-sized servings (2-3 minutes).
- Mix any dressings or flavor boosters: combine olive oil, lemon juice, and a pinch of salt in a small bowl for a light drizzle over veggies. Mix a bit of honey into Greek yogurt for added sweetness if preferred (2 minutes).
- Build the lunch containers: place protein items in one section, followed by grains, then colorful veggies and fruits in separate compartments. Add a small container or section for dips like hummus or yogurt. Sprinkle seeds or nuts on top of veggies or yogurt for texture (5 minutes).
- Final touch and packing: cover containers tightly and store in the fridge until ready to go. Include an ice pack to keep everything fresh during transport (1-2 minutes).
Notes
Prep in advance to save time during busy mornings. Keep fruits like apples tossed in lemon juice to prevent browning. Use separate containers or silicone cups to avoid soggy crackers. Include ice packs to keep lunches fresh in warm weather. Swap ingredients to accommodate dietary needs such as gluten-free or dairy-free.
Nutrition
- Serving Size: One lunch container
- Calories: 35040
- Sugar: 8
- Sodium: 450
- Fat: 15
- Saturated Fat: 3
- Carbohydrates: 35
- Fiber: 6
- Protein: 18
Keywords: no-cook lunch, kid-friendly lunch, summer lunch, healthy lunch, quick lunch, easy lunch, no oven lunch, no stove lunch, lunch rotation, picky eater lunch